
Good morning, Kitschies! I hope you have beautiful weather wherever you are. It's supposed to be in the high 70s today and right now it's clear and not a breath of wind. I got to bed at a half-way decent hour last night and I feel a little more rested today. It could partly be because I'm only working half-day today. I'm playing hookie and taking Nate to see a movie. Is it considered hookie if my employer knows and already granted my time off request? *giggle* I was supposed to take my bestie's oldest boy along with, but...*some*body had other plans. Anyway...I'm almost out of here for the day and that makes me feel good!!
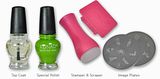
Last week I dug out my green and white polish to do a water marble for St Patty's Day. Out of all the marbling I've done, I think this one is my favorite. And not only do you get to see the end result, I'm going to share a sort of tutorial with you on how I do my water marbling. Take a seat...there's gonna be a lot of pics to share.


Once you are finished with all the fingers on one hand, peel or cut off the tape using scissors. You won't have much to clean up if you taped good enough. Either way, though, using straight acetone makes clean up a breeze.
Let's see the end result, shall we?

Please excuse the whiteness on my middle finger - that's from having to use acetone to clean up what wasn't shielded by the tape. I really, really like how this one turned out. Definitely my favorite so far!


This is my left hand with flash (above) and in sunlight (below). It's hard to pick a favorite, but on this hand it would have to be my index and ring fingers.

I'm horrible at taking pics of my right hand so there's only one (this was taken in indirect sunlight). On this hand, I like the pinkie and index the best. I liked the thumb a lot too, but my topcoat caused a little drag.

This marble even gave me great designs on the under side of my nails! I usually have great wear with my marbles because the tips are already wrapped with polish - hard to get tip wear when the tips are wrapped!

Last one - promise. Here's a closer look at my thumbs. I like them both - probably the left more than the right because the pattern is so different from the others.
*whew* Tired of pictures? Yeah, me too. Kinda. If you'd like a better tutorial for water marbling, check out My Simple Little Pleasures. She does awesome marbles and provides a tutorial for pretty much each design she does.
Happy St Patty's Day! If you go out to celebrate...be careful!! Don't drink too many green beers.


.JPG)


18 comments:
turned out great! I was thinking about doing a green water marble too! Now I really want to!
OMG you did an excellent job!
That is SO cool and incredibly easy! It's definately a must try. Thank you!
They really look like shamrocks... cute! I love MSLP too, she is awesome!
Those look awesome.
Wow! That is so cool. I am not sure I could do it though, although I seriously want to try!
Absolutely amazing!! What movie did you take Nate to see?
Holy Shamrocks! that is the most awesome and YES thank you for the tutorial. I'm going to do this in the next couple days and see what I turn up with (will be my first attempt).
I've decided if I can't get watermarbling to work for me - you will have to come to my place and show me in person. LOL Its only 40 for the high so pack a sweater. ;)
Gorgeous!!!!! You make it look sooo easy too. But I know it's a pistol to make this.
I hope you enjoyed your hooky day!
this is so cute!! i hate water marbling >< i always get gaps on the sides of my nails! idk if its because of the shape of my nails or because im completely inept but i LOVE how they look, hate the process!!
i think that marbles last so long because theyre incredibly thin. whenever i wore them they were ultra durable!
wow, this looks awesome, I think this is my favorite mani of yours. It came out great and is perfect for st. Patrick's day :)
Holy cow cooliest thing ever! Never in a million years would have guessed that would be how to do that! I am sending a friend a link to your blog, she is going to love it.
I looooove this Megan! Gorgeous!
this is freaking amazeballs...seriously my mind is blown. i love the tutorial. i always wondered how people did that.
Amazing mani !
Ok so seriously I thought that you always put a glob on & did each finger individually with a toothpick or something. I am super amazed at how this whole process works. Freaking COOL!!! Oh & it looks really great too!
Using tape saves so much clean up time!! Thanks for sharing!
I'm a bit late finding this post. I just found your blog through your mother's blog.
I LOVE how you did the marbling effect! I used to be a manicurist and this sure would have come in handy back then. I used to marble directly on the nail and sometimes it would just turn into a gloppy mess. I will be trying this technique out soon!
Post a Comment