Showing posts with label breakfast. Show all posts

Monday, July 30, 2012

Breakfast Nom


Happy Monday, Kitschies!  I hope you had a great weekend.  We didn't do much this weekend.  I got in a good skate Saturday morning, but other than that, we were kinda hermits...and that's ok.  School starts soon and I'm sure once it starts, there will be plenty to keep us busy.

When my family was here visiting, I went trolling Pinterest for some good recipes (you can follow me on Pinterest HERE).  I always find lots of great things on there and this recipe I'm sharing with you today is no exception.

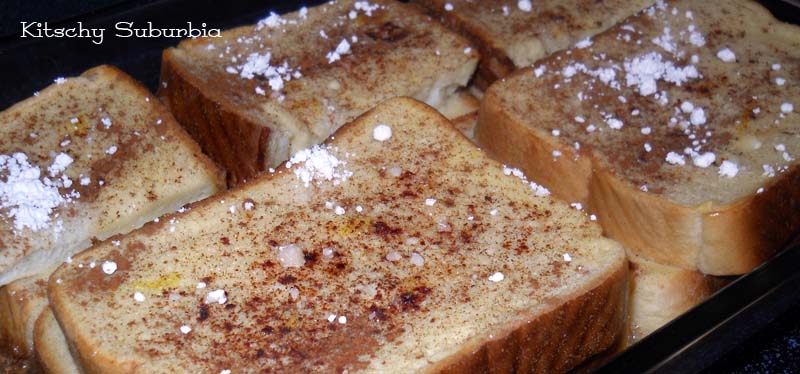
French Toast Bake

1/2 cup melted butter (1 stick)
1 cup brown sugar
1 loaf Texas toast
4 eggs
1 1/2 cup milk
1 teaspoon vanilla
Powdered sugar for sprinkling
Melt butter in microwave & add brown sugar....stir till mixed.  Pour butter/sugar mix into bottom of 9 x 13 pan....spread around.  Beat eggs, milk, & vanilla. Lay single layer of Texas Toast in pan.  Spoon 1/2 of egg mixture on bread layer.  Add 2nd layer of Texas Toast.  Spoon on remaining egg mixture.  Cover & chill in fridge overnight.  Bake at 350 for 45 minutes (covered for the first 30 minutes).

Sprinkle with powdered sugar.  Serve with warm maple syrup (I don't do the syrup part).
NOTES:  This recipe can be doubled or halved.  I made a full recipe for 6 adults and it was just the right amount.  I half it for the 4 of us (2 adults, 2 kids).  The second time I made this, I made it up that morning and I couldn't tell the difference.
I was skeptical because you make it up ahead of time and put it in the fridge overnight.  Bread in egg overnight usually equals blech.  Not this time!  The top layer cooks up nice and toasted and the bottom, while soggy, is still delish!

My hubs doesn't do soggy bread but he eats this without trouble.  And trust me, you don't need syrup!  The brown sugar and butter on the bottom makes a great caramel sauce.

You should try this.  I've made a few recipes I've found on Pinterest but this one is definitely one of the best.

I'm going to try to post another Pinterest recipe later this week (along with some more nails, of course).

Tuesday, February 8, 2011

Pancake Perfection

Good morning, Kitschies!!  It's another wonderful day in the neighborhood here at work.  It's super busy and I'm pulling my hair out because I'm being pulled in too many directions and wearing too many hats.  *sigh*  It's nice to be wanted, but this is getting ridiculous!

Enough about that.  Today I'm going to share an awesome pancake recipe with you.  Ever since I got my new waffle iron/pancake griddle, I've been on a quest to find the perfect pancake recipe.  I've tried Canadian Pancakes (they're good but they're kinda a pain in the butt), regular Bisquick pancakes and the Ultimate Melt-In-Your-Mouth pancakes off the Bisquick box.  They're all good, but they're not great.  This recipe, though, *is* great!

Buttermilk Pancakes
3 cups all-purpose flour
3 Tbsp white sugar
3 tsp baking powder
1 1/2 tsp baking soda
3/4 tsp salt
3 cups buttermilk
1/2 cup milk
3 eggs
1/3 cup butter, melted

In a large bowl, combine flour, sugar, baking powder, baking soda, and salt. In a separate bowl, beat together buttermilk, milk, eggs and melted butter. Keep the two mixtures separate until you are ready to cook. 

Heat a lightly oiled griddle or frying pan over medium high heat. You can flick water across the surface and if it beads up and sizzles, it's ready! 

Pour the wet mixture into the dry mixture, using a wooden spoon or fork to blend. Stir until it's just blended together. Do not over stir! Pour or scoop the batter onto the griddle, using approximately 1/2 cup for each pancake. Brown on both sides and serve hot. 

These pancakes browned up perfectly!  And they're fluffy, too.  I had no issues whatsoever with these pancakes.  That's the first time I've had great pancakes from the first batch to the last.


Perfectly golden brown.  Nate couldn't stop gushing about these pancakes (and he's the trouble eater in the family)!  The hubs missed out on the first edition of these awesome pancakes so I gave in to the sad puppy dog eyes and made him a batch over the weekend.

I don't usually have buttermilk on hand, but I needed it to make a cake for my co-worker (recipe to follow soon-ish).  Of course I only needed a little bit but had to buy a whole quart.  Now I might just be buying buttermilk on a more regular basis!  Now I'm craving breakfast for dinner.  Ugh!

Monday, January 10, 2011

Monday Monkey

Love Candy Cute Monkey Images

Yep.  Two posts in one day.  How lucky are you?!  LOL  Really, I had to make up for the lack of post on Friday and I had to get out the word for Mamarazzi's Pinktastic Swaptastic.  Now I have a yummy recipe to share.

For as long as I can remember, my mom made this awesome breakfast treat for Christmas and New Years morning.  My boys, on occasion, can be picky eaters, but not with this!!  This is one of my favorite breakfast recipes.

Breakfast Monkey Bread
3 (12 oz) packages refrigerated biscuit dough
1 cup white sugar
2 Tbsp ground cinnamon
1/2 cup (1 cube) butter
1 cup packed brown sugar

Preheat oven to 350*.  Grease one 9- or 10-inch Bundt pan.

Mix the cinnamon and sugar together in a bowl and set aside.  Cut each biscuit in to quarters.  Turn biscuit pieces in the cinnamon and sugar mixture until covered.  Toss biscuit pieces in to the Bundt pan.  Shake the remaining cinnamon and sugar mixture over the biscuits.

In a small saucepan, melt butter and brown sugar over medium-high heat, stirring constantly.  Bring to boil and let boil for a minute or two, stirring constantly.  Pour mixture evenly over biscuits in the Bundt pan. 

Bake at 350* for 30-35 minutes.  Remove from oven and immediately overturn pan on to serving platter. 

NOTES:  I don't know if it's the altitude, but my batches never turn out as good as my Mom's.  There's never as much caramel sauce.  Next time, I think I'm going to increase the brown sugar and butter by half.


When working with the canned biscuits, it's easier to work with one can at a time.  If you take the other out too early, they begin to rise and it makes it harder to cut the dough in to quarters.


Mmmmm!  Cinnamon and sugar goodness!  Normally I would never let my boys have so much sugar for breakfast (or in general, really), but this is too good to pass up.  Besides, we don't have this all that often, so once or twice a year doesn't make me a bad Mom.  Really, it doesn't.


See what I mean about the caramel?  There should be more!!  I'm definitely increasing the brown sugar and butter next time!


YUM!!  I want some of this now!  But I'm being a good girl.  I think this lasted about 2 days in our house.  It's the one breakfast thing that Nate will actually *ask* for.  LOL

One more thing!  Today is a very special day - it's my hubs birthday!!  The stinker is taking the week off and getting some (much deserved) alone time in.  So, happy birthday, my dear hubs.  I hope you enjoy the quiet this week!


Have a great rest of your Monday.  Now I'm hungry.  Hmmm...wonder what the office fridge has to offer...

Thursday, October 28, 2010

It's the Great Coffeecake, Charlie Brown!


Good evening, Kitschies!  Did ya miss me yesterday?  My mind has been in a hundred different places at once lately, and tomorrow was no exception.  Maybe some day I'll share with you what's going on, but for now, I must keep it under wraps.

Anyway...One day closer to the weekend!  I hope your Thursday went well.  It was a pretty good day for me.  I'm the late person at work so technically I'm not due in til 9.  And then both my docs were gone this afternoon, so I was out by 1:30.  It was nice to hit the grocery store sans kids (and before 8 at night).  Tonight I bring you a recipe I included in my recipe exchange.  This is my hands-down favorite coffeecake.


Pumpkin Coffee Cake
Topping:
1/4 c packed brown sugar
1/4 c sugar
1/2 tsp ground cinnamon
2 Tbsp cold butter
1/2 c chopped pecans

Cake:
1/2 c butter, softened
1 c sugar
2 eggs
1 c sour cream
1/2 c canned or cooked pumpkin
1 tsp vanilla extract
2 c all-purpose flour
1 tsp baking soda
1 tsp baking powder
1/2 tsp pumpkin pie spice
1/4 tsp salt

In a small bowl, combine sugars and cinnamon. Cut in the butter until mixture resembles coarse crumbs. Stir in pecans; set aside. In a mixing bowl, cream butter and sugar. Add eggs, one at a time, beating well after each addition. Combine the sour cream, pumpkin and vanilla; mix well. Combine dry ingredients; add to creamed mixture alternately with sour cream mixture. Beat on low just until blended. Spread the batter into two greased and floured 8-in. round cake pans. Sprinkle with topping. Bake at 325 degrees F for 40-50 minutes or until a toothpick inserted near the center comes out clean. 

NOTES:  Instead of just a half cup of pumpkin, I use an entire can.  I was afraid it would make it too mushy, but it doesn't.  Combine that with the cup of sour cream and you get an awesomely moist coffee cake.  I make this in a 9x13x2-inch glass baking dish and it comes out perfectly at approximately 45 minutes.  
As soon as I heard that pumpkin was out in the stores, I went to buy some only to be disappointed because they had already sold out. D'oh!  On my second trip, I picked up a couple cans.  I think I've bought a total of six.  So far.
I made this for work a couple weeks ago and I can guarantee you that it did not stick around very long.  I printed out more than a few copies of the recipe.  Seriously awesome coffee cake!
So, on the docket, we have a couple pumpkin recipes (before the hubs and the office peeps get burnt out on pumpkin goodies).  Included in the list are pumpkin cookies (Yes, B.  I said pumpkin cookies.), pumpkin bread and maybe some pumpkin gingerbread.  My mom has a recipe for pumpkin custard - it's been YEARS since I had it, but I might just give it a try.  I just have to pick up a couple glass custard dishes because I've mysteriously lost one or two over the years.  If you have a kickass pumpkin recipe, I'd love to get my hands on it.  You can email me at megharmeyer at gmail dot com.


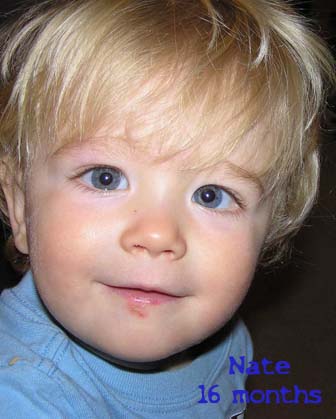
In other news, we have finally weaned Mason off formula!!!  Stoopid formula is so freakin expensive and breastfeeding only lasts so long (for me, anyway).  It seemed like this transition was a little more difficult for Mason than it was for Nate.  Either way, we have a completely moo-juice baby and it's about dang time!  And just for fun, a comparison of Nate and Mason, both at 16 months.

Gah!  It's simply amazing how fast the time goes by and how much each of the boys have changed.  At this point in age, they look a lot alike (to me). 


I'm off to watch the season finale of Project Runway.  I really feel bad for Michael C - I think they should've made an exception and let all 4 designers participate in NYFW.  All I have to say about the finale is that I hope to jeebus that Gretchen doesn't win.  Seriously.  See you tomorrow!

PS: I am SOOOO ready for this dang election to be over.  I've already sent in my absentee ballot - there should be some way that automatically disconnects every political ad from the TV, radio, computer (and even youtube) since I sent mine in.  Gah!  It's not like we have any good choices anyway.  *steps off soap box*


Listening to: Fall Into Sleep by Mudvayne (I don't usually like Mudvayne, but this isn't half bad and the vid is good)
Mood: full brain

Wednesday, October 20, 2010

Berry Nice

Good morning, Kitschies!!  It's Wednesday.  But it feels like Tuesday.  What's up with that?!  I really don't want to do yesterday over.  K?  Thanks.  I'm super tired today for some reason.  Good thing I'll be out and about at lunch - maybe the fresh air will do me good.

I told you that I'd post the recipe for the yummy French toast some time soon.  Is today soon enough for ya?  When we decided that the girls would make a meal and the guys make another meal, the bestie and I decided that we were going to make breakfast.  Good thing we settled on that because the guys didn't arrive at the cabin til almost midnight!!  There's no way we would've been able to wait that long to eat.  We talked about it and we decided that we wanted to make something with fruit.  Originally it was blueberries, but I found this recipe instead and all it took was one look and we were good to go!


Raspberry Cheesecake Stuffed French Toast
1 cup milk
2 Tbsp vanilla extract
1 cup white sugar
2 Tbsp cinnamon
4 eggs, beaten
1 cup raspberry puree
4 oz cream cheese, softened
1 loaf French bread, cut in to 1" slices
butter
confectioner's sugar for dusting
nutmeg for topping

In a bowl, whisk milk, vanilla, sugar, and cinnamon into the beaten eggs until well blended. Set aside. In a separate bowl, cream together raspberry puree and cream cheese until smooth. Make 'sandwiches' by cutting each slice of bread in half and spreading raspberry-cheese mixture in the center, then top with the other half. 

Melt butter over medium heat in a large skillet or griddle. Dip bread into egg mixture, coating thoroughly. Cook until well-browned on both sides, about 5 minutes. Dust with confectioners' sugar and nutmeg. Serve immediately. 

NOTES:  We didn't use the whole 2 Tbsp of vanilla extract because that sounded like an insane amount, but I think it could've used it.  It's just mixed in with the eggs, so it's not like it's actually IN the French toast.  Can't find raspberry puree.  Period.  So, we grabbed a couple bags of frozen raspberries because we weren't sure how much it would take to make a cup of puree.  Turns out that one bag made exactly 1 cup of puree.  If you don't like cream cheese or cheesecake, don't let the title fool you.  The filling was so creamy - it wasn't cheesecake-y or overly cream cheese-y.  I didn't slice the bread all the way through; I think it was much easier to deal with as a pocket instead of two separate pieces.


OMG YUM!!!  In all honesty, I was afraid of this recipe.  I was afraid this would be too much of a PIA to make, but it was super easy.  I was afraid that the stuffing wouldn't stay in, but that wasn't a problem.  I sliced the bread thicker than 1" and it turned out just fine.  I was afraid the bread would be too soggy (soggy bread = nastiness) but it was perfectly browned on the outside and soft on the inside - not soggy at all.  I was afraid that it wouldn't be sweet enough because we didn't bring syrup, but really, the powdered sugar and nutmeg were perfect.  I guess I need to just be "afraid" of a recipe every now and then.  If we don't try things outside our comfort zones, what's the point?

I'm going to Sam's Club to look for a cute costume for Mason today at lunch.  I breezed by them last week but didn't actually look.  I do, however, remember that they were around $10.  Can't beat that!!  Cross your fingers that I find one that's 1) super cute for my Mr Mason, 2) it fits and 3) is really $10.  I'll let you know what I find.

Listening to: Layla by Eric Clapton (the lame unplugged version)  

Mood: Zoooommmmbie

Tuesday, October 12, 2010

Over the Moon

Happy Tuesday, Kitschies!!  It's a little bit different here at work today.  My docs aren't in, but that doesn't mean I get to skip out of work, too.  I didn't have to be here at any specific time, which was nice, but it also means that we get to do the fun stuff that we don't have time to get to during a regular day (like super cleaning, painting scrapes in the wall, etc).  Either way, it gives me plenty of time to do a post for you.

And just like I promised yesterday, I'm bringing you a great dessert (or possibly breakfast) recipe.  Just a warning...it might be a long post.  A while back when I went to the library with my son, I browsed the cookbook section.  I grabbed The Weekend Baker, partly because of the name, and partly because it was about baking.  I thumbed through the recipes and this one caught my eye first.  This recipe required a lot of trial and error on my part.  I'll explain in a bit.

Half Moon Pie Pockets
Shell:
2 sheets frozen puff pastry, 9 1/2-inch square, each
1 large egg, slightly beaten
2 Tbsp sugar


Pumpkin Spice Filling:
1 cup canned solid-packed pumpkin
2 Tbsp canned solid-packed pumpkin
3 Tbsp packed light brown sugar
2 Tbsp flour
3/4 tsp cinnamon
1/2 tsp ground ginger
12 tsp ground nutmeg 

Remove both sheets of puff pastry from the box, set them on a lightly floured surface, and cover with plastic wrap. Do NOT unfold at this point. Let the covered puff pastry sit on the counter top until thawed and just pliable, about 20 minutes.

Meanwhile, position the oven rack on the middle rung. Heat the oven to 425*. Line 2 half sheet pans with parchment or a non-stick liner. Have ready the beaten egg plus 2 Tbsp sugar.

On a lightly floured work surface, carefully unfold pastry. Dust the top of the pastry with a little flour. Roll out each sheet, lightly dusting with flour as needed to prevent the dough from sticking to the rolling pin and work surface, into a 12 inch square. Using a 4" round cookie cutter, cut out 18 circles. Peel away the scraps and cover the rounds with plastic wrap while preparing the filling. 

Select a filling and combine all ingredients in a medium bowl, stirring until blended. 

Place about 1 Tbsp of filling on the center of the round. Brush the edge of the dough with egg. Fold half the dough over the filling to form a half-moon. Using the tines of a fork, press the curved edge to seal tightly. Repeat with remaining rounds. (At this point, the pie pockets can be covered with plastic wrap and refrigerated up to 8 hours or frozen up to 1 month before proceeding with the recipe.).

Arrange the pockets on the prepared sheet pans, spacing them about 2 inches apart. Brush the tops with the remaining egg and sprinkle evenly with sugar. Bake until pastry is puffed and browned, 20 to 25 minute Transfer the sheet pans to racks to cool. Serve warm. 

Pie pockets can be baked up to 6 hours ahead and reheated in a 300* oven until warm, about 15 minute. 

NOTES:  There were recipes for additional fillings (chocolate nut and strawberry, but since it's Fall, I went with pumpkin spice).  The recipe says to let the dough stand out for about 20 minutes to thaw - I found that 20 minutes was not near long enough to make the dough pliable.  I reheated these up in the micro the next morning and they were still pretty tasty, though not quite as good as straight out of the oven.  A word of warning, though.  The filling is HOT!  Like, oven hot.

So.  The first baking recipe I chose to try and I quickly realize that my kitchen isn't *quite* stocked for this kind of baking.  I'm used to just add whatever, mix and throw it in the oven for Baby and me.  First, it called for a 4" round cutter, so I bought a 3-piece round cutter set.  Well, apparently I can't read because it was a 3" cutter.  *sigh*  So, I made due and used the lid to my flour container as the cutter.  It worked, I can't complain.  Second, I don't have a rolling pin.  I used to, but I think it got co-opted by a family Christmas pie baking function.  So, I dug through Nate's blocks and pulled out a round wood block.  It wasn't perfect, but again, it worked.  LOL
Once you have the rounds cut out (which, by the way, there was exactly 18 rounds, just like it said), you brush the edges with egg to create a sort of glue for the pocket.  For some reason, our two pastry/basting brushes were in the dish washer, which was running at that very moment.  Of course.  So, I found a long handled paint brush.  It worked.  *sigh*  Noticing a trend here?  
Place 1 Tbsp of filling in the center of the cutout.  This was really the perfect amount though I think I was a little generous on a couple of them because some of the filling peaked out when I pressed them close.
See?  It looks like a little tongue sticking out.  LOL  I was afraid these wouldn't close very well, but it was no trouble at all.
Here's the first batch - pretty as can be - ready for their tanning session.  Brushed with egg wash and dusted with sugar.  So, here's a question for you.  What's the first rule of baking?  Always wear protection.  Doesn't make sense?  It will here in a minute.

Oh, the horror!  They're a little crispy.  Why?  Because I forgot the first rule of baking: Always wear protection.  *sigh*  I don't know why I forgot because I just made apple pie the week before and used the pie hat.  Luckily I only this kind of mistake once.  I tented the next batch and they came out much better.  Don't fret - they all got eaten regardless of degree of toastiness.
Ahhh...much better!  I think the hubs ate at least 3 of these that night.  I tented the second batch for half the cooking time.  You can tell by this picture that my oven doesn't cook evenly.  Some day I'll get a new oven.  Some day.

One more question for you.  The recipe in my cookbook said to reserve the scraps but never says what to do with said scraps.   I could've rolled it all out and made more pockets, but that means I'd have to make more filling.  And I don't have a proper rolling pin, so I probably would've ended up with a big doughy mess and not pretty puff pastries.  What would you have done with the scraps?

I think I'm going to actually go get some work done.  I hope you enjoyed this installment of Adventures In Baking.  Don't forget to hop on over to my Recipe Exchange - today is the last day to join in the fun!  I'll have emails sent out to the participants by Thursday.

Listening to: This is Your Life by The Killers
Mood: slackin'

Wednesday, September 15, 2010

Holy Yummy Breakfast, Batman!

It's a wild and crazy Wednesday, my dear readers!  We got a call early this morning from my MIL telling us that she won't be able to watch the boys today.  You all know how busy it's been at work lately, so I've been needing/wanting a day away from the place, but this isn't exactly what I had in mind.  The hubs has a food show today, so there was no way he'd be able to stay home with the little ones.  Either way, I'm home; the house is somewhat quiet because Mason is napping (for now, anyway) and Nate is playing Lego Star Wars.  So, before Mason wakes up and Nate gets tired of playing Wii (not bloody likely), I figured I'd get in a post.

On the weekends we like to make breakfast.  Usually it's the usual pancakes or waffles or some sort of eggs.  Tired of the "usual", I went looking for something different on Allrecipes.  I found two awesome recipes that I'll share with you today.


Wonderful Waffles
2 1/4 cups all-purpose flour
1 tsp baking soda
1 tsp baking powder
1/2 tsp salt
1/4 cup butter
1/4 cup brown sugar
3 egg yolks
2 cups buttermilk
3 egg whites

Preheat waffle iron. In a medium bowl, sift together flour, baking soda, baking powder and salt; set aside. 

In a large bowl, cream butter and brown sugar until light and fluffy. Beat in egg yolks. Blend in flour mixture alternately with buttermilk. 

In a large glass or metal mixing bowl, beat egg whites until stiff peaks form. Fold 1/3 of the whites into the batter, then quickly fold in remaining whites until no streaks remain.

Spray waffle iron with non-stick cooking spray, or lightly brush with oil. Ladle the batter onto preheated waffle iron. Cook the waffles until golden and crisp. Serve immediately. 

NOTES:  I don't normally have buttermilk on hand, so I did a quick search for buttermilk substitute and came up with a comparable replacement: 1 Tbsp lemon juice and enough milk to make 1 cup.  Seemed good to me!  You can really taste the brown sugar in this so you didn't need a whole lot of syrup.  I made these today for the boys and they both gobbled them up!

My Dad and I must be from the same school of thought when it comes to making waffles: If you don't make a mess, you're not doing it right.  LOL


Fluffy Canadian Pancakes
1 cup all-purpose flour
1 Tbsp baking powder
1 cup milk
3 egg yolks
3 egg whites

In a medium bowl, combine flour and baking powder. Stir in milk and egg yolk until smooth. 

In a large glass or metal mixing bowl, beat egg whites until stiff peaks form. Fold 1/3 of the whites into the batter, then quickly fold in remaining whites until no streaks remain.

Heat a lightly oiled griddle or frying pan over medium high heat. Pour or scoop the batter onto the griddle, using approximately 1/4 cup for each pancake. Cook until pancakes are golden brown on both sides; serve hot.

NOTES:  I don't have a clue what makes the "Canadian" pancakes.  Can any of my Canadian readers clue me on this?  These pancakes are SOOOO good!  Sweet, light, fluffy.  MUCH better than the run of the mill Bisquick pancakes we usually make.  Both of these recipes are a little time consuming, but totally worth the extra effort!

Both actual food pictures came from Allrecipes.com

Listening to: Can't Buy Me Love by Paul McCartney (no, not The Beatles)
Mood: A little stressed

Monday, July 5, 2010

Go Bananas!!

I like food. While growing up, all of our family functions included food - a LOT of food. Nothing gourmet, of course, but good, home-cooked food. You know, the kind that is made with REAL butter and has TONS of calories? And you go back for seconds? And thirds?

I'm not a really big breakfast person, but when I do make breakfast (other than my protein shake and fruit), I like to *make* breakfast. Case in point: I made pancakes with blueberries and strawberries on Monday. I have yet to attempt an omelet, but I do like to make muffins, burritos or breakfast breads. I tried this recipe a couple weeks ago and proceeded to take the majority of the muffins to the office because I know if I keep them in the house, we'll eat them. And while that would usually be a good thing, it really wouldn't be. This is a good recipe to use up almost-ready-to-throw-out bananas. Enjoy!! Oh, and this isn't a "family" recipe - I tend to be kinda protective over those. *shrugs*

Banana Streusel Muffins

2 cups all-purpose flour
1 cup sugar
1 tsp baking powder
1/2 tsp salt
1/2 tsp baking soda
1/4 tsp ground cinnamon
2 eggs
1 cup sour cream
1/4 butter, melted
2 medium ripe bananas, mashed

STREUSEL:
1/4 cup sugar
3 Tbsp all-purpose flour
1/4 tsp ground cinnamon
2 Tbsp butter

In large bowl, combine the flour, sugar, baking powder, salt, baking soda and cinnamon. In a small bowl, beat eggs, sour cream, butter and bananas; stir into dry ingredients just until moistened. Fill greased or paper-line muffin cups 3/4 full.

For streusel, combine sugar, flour and cinnamon in a small bowl; cut in butter. Sprinkle over muffins. Bake at 375 degrees for 20-25 minutes.

NOTES: I used low fat sour cream. Other than that, I didn't make any changes. I do remember this made more than the 12 servings it said (I think it made 18), so I ran out of crumb topping. There wasn't a whole lot of banana flavor, so next time I'll either do 2 1/2 bananas or I'll find some banana extract, or something.

Yeah, those bananas look disgusting, but they worked!


All ready for baking!


Fresh outta the oven...*drool*


SOOOO good!


Are there any "family" recipes you make for your own family? What memories do you have involving family and food?

Listening to: Life in Technicolor by Coldplay
Mood: TIRED

Tuesday, June 8, 2010

Bright Beginnings

If people were meant to pop out of bed, we'd all sleep in toasters. ~Author unknown, attributed to Jim Davis

Good evening, Kitschies! I hope this evening finds you well. It was another great day in the neighborhood and the house is finally starting to quiet down a bit (read: kidlets are in bed). Technology is cooperating with me - so far - so I bring you the post I was meaning to do last night. Ahhhh...what did we *ever* do without computers? Or cell phones? Or caller IDs? Or voice mail? Or DVRs? We actually had *gasp* conversations with real people!! Wow - those were the good 'ol days. HEY! I'm not THAT old...but I do remember rotary phones. And the milk man. Really. Enough for the trip down memory lane. This post has two parts: food and polish. What could be better? First things first: food!!

When my parents and sister were visiting last week, my mom clued me in to this wonderful recipe she found on Allrecipes. I love this site! If there's anything I'm craving, I hop on Allrecipes and find whatever it is that will satisfy my need for new recipes. Now...I'm not much of an egg person, so I didn't scarf this one down, but everybody else liked it, so it can't be all bad. The hubs even had it for leftovers yesterday morning! I made a few alterations to the recipe which I will mention at the end of the recipe. This is a great recipe when you have a crowd of people to feed. I have a 4-quart slow cooker and it was filled to the TOP!! It was so nice to get up in the morning and have breakfast already finished (who doesn't love THAT?).

Slow Cooker Western Omelet


1 (2 lb) package frozen shredded hash brown potatoes
1 lb diced cooked ham
1 onion, diced
1 green bell pepper, seeded and diced
1 1/2 cups shredded Cheddar cheese
12 eggs
1 cup milk
salt and pepper to taste


Lightly grease a 4 quart or larger slow cooker. Place 1/3 of the hash brown potatoes in a layer on the bottom. Layer 1/3 of the ham, onion, green pepper, and Cheddar cheese. Repeat layers two more times. In a large bowl, whisk together eggs and milk, and season with salt and pepper. Pour over the contents of the slow cooker.

Cover, and cook on Low for 10 to 12 hours.


NOTES: I basically used what I had on hand. I traded out the ham for sausage patties (just cut them up in chunks), and yellow bell pepper. The recipe says this will fit in a 4-quart slow cooker - mine was filled to the absolute top and I really don't think the entire recipe would've fit - unless it was smashed down and then I don't think it would've cooked properly. I decreased the recipe by 1/3 (it still used 8 eggs!) and cooked for 9 hours.

Now for part 2!

I had an apple with my lunch today and it was blech! I had quite a bit of time left at that point, so I decided to go to the grocery store to get a new, hopefully better, apple. I found an apple, still not that perfect apple I was in search of, but I found something better! Of course I wandered over to the cosmetics section and found they had a big table full of clearance/last chance stuff. I searched through every one of those boxes and found one lonely polish. At the discount price of $1.44, I don't think it would've mattered what the brand or color was. I grabbed it (Oh! A piece of candy!) and trotted my happy butt up to the register. Apparently, it's from a Summer 2008 collection, but the formula still looks good. It might end up being a toe pedi color because it looks pretty sheer - and if looks sheer in the bottle, that means it's going to be *super* sheer on! Here's what I found...

Revlon Glimmer Gloss in Apricot Freeze

A close-up, blurry pic to show the pretties

I don't think I'd call this apricot, but it's a pretty, sheer orange base with pink and gold glitter(?) shimmer(?). If it were a current color, it would be a jelly, but this is much too thin to be a jelly. I'm looking forward to trying this one out as soon as my current mani (a challenge accepted) requires replacing.

That's it, my girlies. I hope you have a great evening. Check back early. Check back often. New posts will be made soon!! Thanks for stopping by.

Listening to: Not Only Numb by Gin Blossoms
Mood: HOT!! (and not in a good way)

Wednesday, May 12, 2010

Wakey, wakey!

Once upon a time, I didn't care for green chile. I thought it was slimy and just...not...good. Flash forward to present day. I love the stuff!! Having been in New Mexico for over 10 years now (!), it's become part of my every day menu. We put it on everything!! Eggs, potatoes, breakfast burritos, chips, fries, burgers, etc. Now, I'm not talking about Ortega chiles or jalapenos. I'm talking the real deal, New Mexico Hatch roasted green chile. In the late Summer, you can have a bag of it roasted at virtually ANY grocery store or market. That is one of the best smells ever (partly because it signals the coming Fall). So, today I offer up a breakfast recipe that I love (with green chile, of course).

I originally made this for a recipe challenge on a message board. Since it was open to all over the country, I used canned ingredients to be sure I could pass on the recipe to others. I think this would be even better if you have fresh ingredients (ie: diced green chile and green chile enchilada sauce), but it was pretty good anyway. Enjoy!

Breakfast Enchiladas

Serves 8**

1 (16 oz) package frozen hash brown potatoes
1 cup diced cooked ham
1 Tbsp vegetable oil
1 (4.5 oz) can diced green chile peppers
1 1/2 cups shredded Cheddar cheese, divided
1 (28 oz) can green chile enchilada sauce

Preheat oven to 375*.

Brown hash browns and ham in 1 tablespoon of oil in a medium skillet over medium high heat. Stir in diced green chilies and 1/2 cup of Cheddar cheese. Cook until cheese has melted.

Coat the bottom of a 9x13 inch baking dish with a small amount of enchilada sauce. Dip each tortilla in remaining sauce, and fill with potato-ham mixture. Roll each as tightly as possible and place in the baking dish, seam side down. Top with remaining sauce and cheese, and cover with tin foil.

Bake, covered, in the preheated oven for approximately 20 minutes. Remove foil and bake for another 10 minutes, or until lightly browned on top. Serve immediately.

**This really didn't make as many as it said it would, at least the way I made them. If I wanted it to make 8, I would *easily* double the ingredients.**


Ooooh!! And I'm happy to announce that I'm up to 10 followers! This makes Megan happy. :) Remember - invite your friends (or your enemies) because there is a giveaway to be had once I reach 15 followers. If you like the recipes so far, you'll love the giveaway.

Listening to: Yellow (live) by Coldplay
Mood: allergic