Showing posts with label recipe. Show all posts

Monday, July 30, 2012

Breakfast Nom


Happy Monday, Kitschies!  I hope you had a great weekend.  We didn't do much this weekend.  I got in a good skate Saturday morning, but other than that, we were kinda hermits...and that's ok.  School starts soon and I'm sure once it starts, there will be plenty to keep us busy.

When my family was here visiting, I went trolling Pinterest for some good recipes (you can follow me on Pinterest HERE).  I always find lots of great things on there and this recipe I'm sharing with you today is no exception.

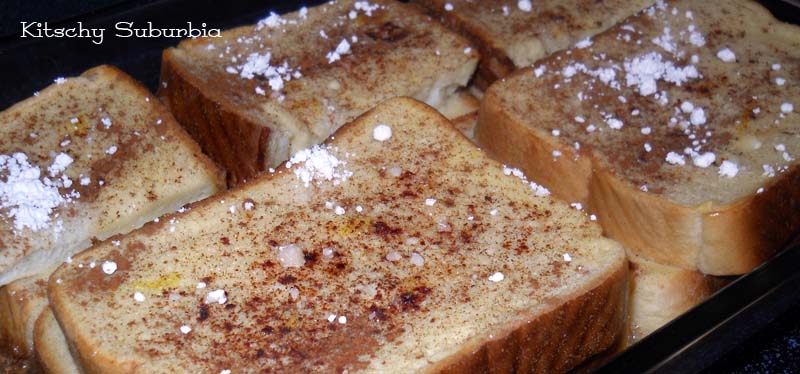
French Toast Bake

1/2 cup melted butter (1 stick)
1 cup brown sugar
1 loaf Texas toast
4 eggs
1 1/2 cup milk
1 teaspoon vanilla
Powdered sugar for sprinkling
Melt butter in microwave & add brown sugar....stir till mixed.  Pour butter/sugar mix into bottom of 9 x 13 pan....spread around.  Beat eggs, milk, & vanilla. Lay single layer of Texas Toast in pan.  Spoon 1/2 of egg mixture on bread layer.  Add 2nd layer of Texas Toast.  Spoon on remaining egg mixture.  Cover & chill in fridge overnight.  Bake at 350 for 45 minutes (covered for the first 30 minutes).

Sprinkle with powdered sugar.  Serve with warm maple syrup (I don't do the syrup part).
NOTES:  This recipe can be doubled or halved.  I made a full recipe for 6 adults and it was just the right amount.  I half it for the 4 of us (2 adults, 2 kids).  The second time I made this, I made it up that morning and I couldn't tell the difference.
I was skeptical because you make it up ahead of time and put it in the fridge overnight.  Bread in egg overnight usually equals blech.  Not this time!  The top layer cooks up nice and toasted and the bottom, while soggy, is still delish!

My hubs doesn't do soggy bread but he eats this without trouble.  And trust me, you don't need syrup!  The brown sugar and butter on the bottom makes a great caramel sauce.

You should try this.  I've made a few recipes I've found on Pinterest but this one is definitely one of the best.

I'm going to try to post another Pinterest recipe later this week (along with some more nails, of course).

Monday, June 25, 2012

Summer Salad


Good morning, Kitschies!  I hope you had a good weekend and didn't melt in the heat.  It's been super hot and there's no rain in sight.  I'm really hoping we get some good monsoons this summer, but it's not looking like that so far.

ANYway...I've been trying to eat healthier (yes, I know you've heard that from me before), but this time I'm serious.  I kinda have to eat better because junk in = junk out.  You're probably tired of hearing me talk about it, but derby kicks my ass...in a good way.  I can practice day in and day out, but until I get my eating under control, I'm not going to see the changes I want/need to see.  So, as a way to keep on top of it, I went on a "healthy" recipe hunt.  You usually think healthy = tasteless (at least I do), but I did my best to make sure what I found was good for you AND tastes good, too.  This is the first recipe I tried.

Quinoa Salad

Ingredients
1 cup uncooked quinoa
1 cup feta
1 can (15 oz) black beans, drained and rinsed
1 can (15 oz) whole kernel corn, drained
Red bell pepper, diced
Spinach, handful, chopped small
Red onion, a few rings, diced small

Dressing
1/2 cup fresh lime juice
3 Tbsp red wine vinegar
1/4 cup olive oil
1/4 tsp Cayenne powder (more or less, depending on preference)
1 Tbsp cumin
1/2 tsp salt
Pepper to taste

Cook quinoa. To cook quinoa bring 1 1/4 cup water or chicken broth to a boil (basically the ratio is 1 part quinoa to 1.25 part liquid). Add 1 Cup rinsed quinoa, give it a good stir, reduce heat to low and let it simmer for about 30-35 minutes**

While your quinoa is simmering, make up your dressing by whisking together all dressing ingredients. In a separate bowl add black beans (rinsed, drained), corn (rinsed, drained), diced pepper, spinach and red onion.

Once quinoa is done cooking and has cooled, add it to the other ingredients. Pour dressing over everything. Mix up. Enjoy!

NOTES:  I didn't use fresh limes - I just use the prepared juice.  Next time I think I'll use a bit less cumin - it was a bit strong for my taste.  And...it didn't take anywhere near 30 minutes to cook the quinoa...maybe 15-20 minutes.  I didn't use all the dressing but kept the remaining dressing for a marinade - I think it'll be great on chicken.


So colorful!  I really, really like this, which is good because the hubs...notsomuch.  And the kids?  I didn't even ask them to try it because my previous quinoa recipe didn't go over so well with them.


I have been eating on this over the weekend and it's definitely better the second day - all the flavors have had a chance to marry together.  I described this to my sister and she said it sounded like Greek salad, which I think is a good description.  Kind of a southwest Greek salad!

It's shaping up to be a busy week, so take it easy and enjoy some great summer food!  Oh...and I promise to get my blog background changed soon - though it's nice to think of winter when it's so flippin' hot out!

Wednesday, January 25, 2012

A Nom for Wednesday

Happy Hump Day, Kitschies!!  It's been a bit chaotic here at the clinic the last few days and I haven't been at my work station much.  It's lunch time now and I'm squeezing in a post because...how can I ignore you?

This is one of my favorite go-to recipes; I fix it at least every few weeks.  Chances are you have the ingredients on hand!  I originally found this in a Kraft recipe magazine but thanks to the wonders of the internets, you can now find it online.

Smothered Chicken & Green Bean Skillet
4 small boneless, skinless chicken breast halves
2 cups frozen green beans
1 can (10.75 oz) condensed cream of mushroom soup
1/2 cup water
1/4 tsp dried thyme leaves
1 cup shredded Cheddar cheese 

HEAT large nonstick skillet on medium-high heat. Add chicken; cover. Cook 5 to 7 min. on each side or until done (165ºF). Remove chicken from skillet.

ADD beans, soup, water and thyme to skillet; cover. Cook 6 min., stirring frequently.
RETURN chicken to skillet. Cook 1 min. or until hot. Top with cheese. 

NOTES:  I go between using cream of chicken, cream of mushroom and cream of chicken and mushroom soup - it's whatever I have on hand and really, I can't tell the difference.  

See?  You have all that stuff sitting in your cabinets and in your fridge right now, don't you?

Soooo good!  And the boys eat it without complaint (which is a miracle in my house).


Enjoy the rest of your Wednesday!  I'm off to eat some food so I can get back to the grind.

And don't forget to enter my giveaway (you do not have to be a follower).  You can check it out HERE.

Tuesday, January 10, 2012

Caramel Corn: Recipe

Good morning, Kitchies!!  It's been an insanely busy morning, but I need to take a breather, so I thought I'd throw down a post.  I'm pretty sore from derby practice last night and it's making the day that much harder to get through. 

But good, sweet, not-good-for-you food always makes things better, right?  You know I am!  I was going to save this recipe for next week, but most of the comments said they were interested so I bumped up that post to today.  You're welcome.

I was craving caramel corn around New Years and I finally remembered to sit down and find a recipe this last weekend.  I started out looking for a salted caramel sauce recipe (because that's my new cooking obsession) and I stumbled across this awesome caramel corn recipe on my new favorite recipe blog: Recipe Girl.  I had flagged another recipe, but this one just called to me.

Caramel Corn
1/2 cup (1 stick) salted butter
1 cup light brown sugar
1/4 cup light corn syrup
2 teaspoons kosher salt
1/4 teaspoon baking soda
1/2 teaspoon vanilla extract
12 cups popped popcorn

Preheat oven to 300 degrees F. Line a rimmed baking sheet with foil and spray with nonstick spray.

Melt butter in a 1 gallon pot over medium-high heat. Add brown sugar and corn syrup. Stir to combine. Bring to a boil, then reduce the heat to low and let simmer undisturbed for 4 minutes. Stir,then continue to cook for an additional 4 to 6 minutes, stirring every 30 seconds, until the mixture is a deep golden color. Turn off the heat and whisk in salt, baking soda and vanilla. Set the whisk aside and stir in the popcorn. Scoop up the syrup from the bottom and over the top. Keep stirring and scooping the syrup over the popcorn until it is evenly covered and there is no syrup left on the bottom of the pan.

Spread the mixture onto the prepared cookie sheet and bake for 15 to 20 minutes, stirring every 5 minutes, until the caramel corn has turned a deep amber color. Remove the caramel corn from the oven and spoon it onto a waxed paper-lined surface to cool. When completely cooled, store caramel corn in a covered container- it should stay fresh for up to a week.

NOTES:  *You can use air-popped popcorn for this recipe or stovetop too. Here's an easy stove-top method to follow. Microwave popcorn will work as well, but it's not recommended as being the best choice.

My boys *devoured* the remaining stove-top popped popcorn...luckily they were already in bed by the time the caramel corn came out of the oven.  It killed me to work in the kitchen while this was baking.  It smelled soooooo good!

Now, my caramel corn didn't come out near as coated as Recipe Girl's did, but I'm okay with that because I think *that* much coating would be overkill.  And remember I said I was looking for a salted caramel sauce recipe?  This recipe kinda kills that craving because it's a bit salty, but not too much so.  It's just salty enough to enhance the sweet.  Soooo good! 

I have half a gallon baggie full of this and now all I want to do is run home, park my butt on the couch and throw on some trash TV and eat the rest!!!  Somebody asked about calorie content on this, and while I don't know what the count would be, I don't imagine this would be considered a "diet" food.  LOL  Not when your ingredients are sugar, corn syrup and starch. 

Either way, you need to make some of this.  NEED!

Tuesday, January 3, 2012

Call It What You Will

Good day, Kitschies!  Other than a big parenting FAIL (we thought Nate went back to school today but it's really not til tomorrow), it's been a pretty good day.  I went to my first derby practice last night in what feels like at least a month and I'm a little sore but nowhere near how I thought I would be.  Work was super busy this morning which was also a nice change.  And now I'm home with Nate. 

I have a really, really good recipe to share with you today.  I've made this before but it got pushed to the bottom of my recipe rotation and hadn't made it for quite a while.  I made this the day I was waiting for my new stove to be delivered/installed since I didn't know exactly what time they'd get here.  I got this from good 'ol allrecipes.com and you can argue whether it's a chili or a soup, but whatever it is, call it delish!

Slow Cooker Chicken Taco Soup
1 onion, chopped
1 (16 ounce) can chili beans
1 (15 ounce) can black beans
1 (15 ounce) can whole kernel corn, drained
1 (8 ounce) can tomato sauce
1 (12 fluid ounce) can or bottle beer
2 (10 ounce) cans diced tomatoes with green chilies, undrained
1 (1.25 ounce) package taco seasoning
3 whole skinless, boneless chicken breasts
shredded Cheddar cheese (optional)
sour cream (optional)
crushed tortilla chips (optional)
  
Place the onion, chili beans, black beans, corn, tomato sauce, beer, and diced tomatoes in a slow cooker. Add taco seasoning, and stir to blend. Lay chicken breasts on top of the mixture, pressing down slightly until just covered by the other ingredients. Set slow cooker for low heat, cover, and cook for 5 hours. 

Remove chicken breasts from the soup, and allow to cool long enough to be handled. Stir the shredded chicken back into the soup, and continue cooking for 2 hours. Serve topped with shredded Cheddar cheese, a dollop of sour cream, and crushed tortilla chips, if desired. 

NOTES:  I used Heineken because I know that's a beer the hubs will drink.  I don't touch the stuff.  They sell small bottles of "cooking" wine, why not cooking beer?  I'm just sayin'.

I don't usually say this, but I can't wait til my next office potluck because I know what I'll be bringing.


And like most soups, this is even better the next day.  It makes plenty for a night's dinner, but there's plenty leftover, too.  Don't let the idea of the beer in this recipe scare you - I don't like beer and I can't taste it at all in this soup.

If you've got some cold weather in the forecast, I definitely recommend picking up the ingredients for this soup.  You won't be sorry!

Tuesday, December 13, 2011

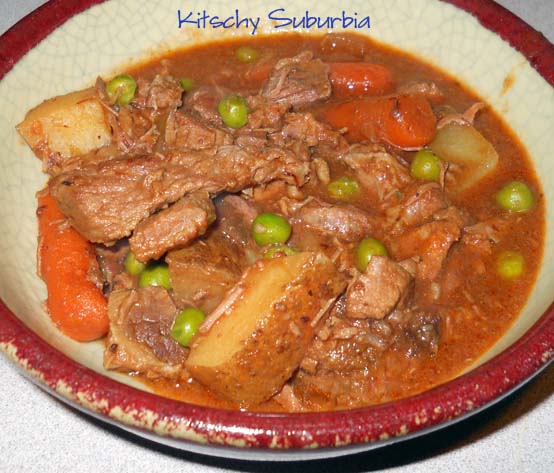
Classic Beef Stew

Happy Tuesday, Kitschies!  It was a busy day yesterday - finished the majority of my Christmas shopping (it's amazing what a difference shopping alone on a Monday morning can make), made a slow cooker dinner (not this one), got my new stove and finished all the laundry!  Now the fun of wrapping can begin.  Blech.

The weather is cooling down quite a bit (a damned lot) and that means it's time to drag out the slow cooker.  I try to use the slow cooker at least once a week during the winter.  I come home to a cooked meal and, more often than not, we have leftovers for the next day.  I was looking for something new to try and I found this recipe at Real Simple during one of my hunts.

Slow Cooker Beef Stew
4 lbs bottom round, well trimmed and cut to 2-inch pieces
1 cup all-purpose flour
1/3 cup olive oil
2 large onions, chopped (about 2 cups)
1 6-oz can tomato paste
1 cup dry red wine
1 lb potatoes, cut into 2-inch pieces
1/2 lb peeled baby carrots
2 cups beef broth
1 Tbsp Kosher salt
1 tsp dried thyme leaves
1 bay leaf
1 cup frozen peas, thawed

Coat the beef in the flour. Heat a few tablespoons of the oil in a large skillet over medium-high heat. Brown the meat, a few pieces at a time, adding more oil as necessary. Transfer to a 4- to 6-quart slow cooker.

Add the onions to the skillet and cook over medium heat until tender, about 10 minutes. Stir in the tomato paste and coat the onions; transfer to the cooker. 

Pour the wine into the skillet and scrape up any browned bits; add to the cooker. Stir in the potatoes, carrots, broth, salt, thyme, and bay leaf.

Cover and cook on low heat for 7 1/2 hours, or on high for 4 hours. Add the peas and heat through.

NOTES:  I reduced this recipe, basically, by half and still had PLENTY.   I didn't measure out the carrots or the peas - just added what looked like enough.  And I didn't thaw the peas - I just adjusted the heat to high and cooked for about 30 minutes.


As with most stews, this was better the second time around.  I may or may not have added a little more wine than the recipe called for.  I remember Nate ate this, but I don't remember if Mason did (he's been *super* picky about eating lately). 

Do you have a favorite go-to slow cooker recipe for when the weather turns chilly?

Tuesday, November 29, 2011

Nearly Perfect

Good Tuesday to you, Kitschies!  I don't know how it is where you are, but it's really starting to cool down here in New Mexico.  And that means it's time to get back in the kitchen!

I love to bake - especially when I can share my baking with family and friends.  Don't get me wrong, I could keep all my goodies to myself, but I'd end up weighing a lot more than I already do.  So, why not share the weight gain?  LOL

A while ago, a co-worker and I got an invitation to a soft opening of Paradise Bakery.  When they welcomed us in, they offered us a choice of cookies to try and I picked their chewy ginger cookies (that's not the name, but it's been so long, I can't remember the exact name).  I loved it so much (and so did my co-worker) that as soon as I got in to work, I went hunting for the recipe!  Now, this is not a plug for Paradise Bakery, but if you have a chance, go there and get one of their cookies - they. are. perfection!  This is, however, the result of my hunt.  This recipe isn't exactly the same, so I'll call them nearly perfect.

Big Soft Ginger Cookies
2 1/4 cups all-purpose flour
2 teaspoons ground ginger
1 teaspoon baking soda
3/4 teaspoon ground cinnamon
1/2 teaspoon ground cloves
1/4 teaspoon salt
3/4 cup margarine, softened
1 cup white sugar
1 egg
1 tablespoon water
1/4 cup molasses
2 tablespoons white sugar

Preheat oven to 350 degrees F (175 degrees C). Sift together the flour, ginger, baking soda, cinnamon, cloves, and salt. Set aside. 

In a large bowl, cream together the margarine and 1 cup sugar until light and fluffy. Beat in the egg, then stir in the water and molasses. Gradually stir the sifted ingredients into the molasses mixture. Shape dough into walnut sized balls, and roll them in the remaining 2 tablespoons of sugar. Place the cookies 2 inches apart onto an ungreased cookie sheet, and flatten slightly. 

Bake for 8 to 10 minutes in the preheated oven. Allow cookies to cool on baking sheet for 5 minutes before removing to a wire rack to cool completely. Store in an airtight container.

NOTES:  In order to make the cookies look like the picture you see on Allrecipes, you do not flatten them - at all.  I just dropped them directly from the spoon and they cooked off just fine.

Of course I had my trusty kitchen helper with me for these!  Nate loves to help me in the kitchen - but the crazy boy doesn't usually eat the sweets we make...he'd rather have candy.  *sigh*

The end result of just piling the dough on the cookie sheets came out better than flattening them out.

Mmmmm!  Warm cookies.  Is there anything better than a warm cookie just out of the oven?  Yeah.  I didn't think so, either.

See what I mean?  You can see the "slightly flattened" cookies toward the top.  The dropped cookies look much prettier to me.  Don't get me wrong - the flattened cookies tasted fine, they just weren't as pretty.

I shared these cookies with my office and they were gone by days' end.  I'm sharing the recipe with you now so you can add something new to your Christmas cookie plates - you won't be sorry!

Monday, September 26, 2011

Good For YOU!

Good morning, Kitschies!!  Another new week is upon us.  How did *that* happen?  I can barely remember things that happened last week.  One thing I *do* remember is that my hubs told me I should take a break (it's a good thing) and escape for a little while.  So...I'm taking Mason and we're going on a road trip!  We're headed "home" to visit my parents (and the rest of the family) later this week.  We usually don't do spur of the moment things like this, but for this, we're making an exception.  My mom has ALS and the annual fundraiser walk is this Saturday, October 1st.  The last time I made it out for the walk, Nate was 2, the same age as Mason is now, so it's time to do it again!  I'm so excited!!  I am not, however, looking forward to the drive, but we'll survive.  Somehow. 

I have a great, easy, healthy recipe for you today.

About a year ago, my bestie's MIL told me about quinoa (pronounced keen-wah).  Quinoa is one of those "super foods" you never hear about.  It's a grain that is super-high in fiber (14 grams per 3.5 oz), no cholesterol and relatively low in carbs.  And it tastes good, too!  Sound too good to be true?  It isn't - and here's a great recipe for proof.

Quinoa & Black Beans
1 tsp vegetable oil
1 onion, chopped
3 cloves garlic, peeled & minced
3/4 cup uncooked quinoa
1 1/2 cups vegetable broth
1 tsp ground cumin
1/4 tsp ground cayenne pepper
salt and pepper to taste
1 cup frozen corn kernels
2 (15 oz) cans black beans, rinsed and drained
1/2 cup fresh cilantro, chopped
 
Heat the oil in a medium saucepan over medium heat. Stir in the onion and garlic, and saute until lightly browned. 

Mix quinoa into the saucepan and cover with vegetable broth. Season with cumin, cayenne pepper, salt, and pepper. Bring the mixture to a boil. Cover, reduce heat, and simmer 20 minutes.

Stir frozen corn into the saucepan, and continue to simmer about 5 minutes until heated through. Mix in the black beans and cilantro. 

NOTES:  I'm not a big fan of cilantro, so I left it out.  I don't think it was missing anything without it.


The hubs and I loved this and it was good even as leftovers.  The kids?  They ate it but I could tell it wasn't one of their favorites.  One time not long after making this, Nate proclaimed: "I love quinoa!" but then quickly responded with: "Wait.  What's quinoa?"  When I reminded him what it was, he was very fast to correct himself.  LOL  

So...if you want a quick, good-for-you meal, grab that quinoa!  I'm not sure of the availability, but I got mine at Sunflower Market (a whole foods kind of store).

Hang in there - Monday is going to be over before you know it!

Tuesday, August 30, 2011

Two Good Eats for Tuesday


Good morning, Kitschies!  It's only Tuesday and it's been a crazy week, partly because it seems like the weekend took forever to get through and then it's bled on over to this week.  I'll spare you the deets, but it was not a good weekend.  And come to think of it, that *not good* started on Friday.  *sigh*  Anyway...I'm not going to let this be a Debbie Downer post, so let's get on with it, shall we?

I went to a derby practice on Saturday and then again last night.  Saturday's practice was brutal - my legs were sore after that practice and then add in a couple falls last night (thanks stoopid berries from the damned trees and sand on the track) and I'm one sore mama today!  I am so thankful to work with some great physicians - chiropractic/osteopathic manipulations are saving my derby-lovin' life!  I may be sore and I may be bruised, but I'm lovin' every second of it.

I haven't share a good recipe with you lately, so I dug a good one out of my pending folder for today.  These recipes came from my go-to recipe site: allrecipes.com.

BBQ Chicken
3 Tbsp vegetable oil
1 1/2 cups cider vinegar
1 Tbsp salt
1/4 tsp ground black pepper
2 tsp poultry seasoning
2 pounds cut up chicken pieces

Heat grill to medium heat. 

In a small skillet combine the oil, vinegar, salt and pepper and put over low heat. Add the poultry seasoning while stirring constantly; when sauce mixes well and starts to bubble, it is done. 

Place chicken on hot grill and brush with sauce. Grill for 45 to 60 minutes, turning every 5 to 10 minutes, and brush chicken with sauce after each turning. Grill until chicken is done and juices run clear. (Note: Be sure to keep an eye on the chicken as it cooks, as it tends to have flair ups due to the oil and chicken drippings!) 

NOTES:  I used skinless, boneless chicken breasts, not pieces.  And instead of brushing the chicken while it was grilling, I marinated it for a few hours.  I think the flavor is better that way.  

And a bonus, side dish recipe:


Roasted Garlic Cauliflower
2 Tbsp minced garlic
3 Tbsp olive oil
1 large head cauliflower, separated in to florets
1/3 cup grated Parmesan cheese
salt and pepper to taste
1 Tbsp chopped fresh parsley

Preheat the oven to 450 degrees F (220 degrees C). Grease a large casserole dish. 

Place the olive oil and garlic in a large resealable bag. Add cauliflower, and shake to mix. Pour into the prepared casserole dish, and season with salt and pepper to taste. 

Bake for 25 minutes, stirring halfway through. Top with Parmesan cheese and parsley, and broil for 3 to 5 minutes, until golden brown. 

NOTE:  I did not use parsley - I didn't think it would add anything and it doesn't matter to me if my side dish lacks color.

I think the cider vinegar in the marinade really made the chicken moist.  I really liked this recipe, and so did the others (boys big and small alike).


I liked the cauliflower but I don't remember if the boys did or not.  I have a feeling they probably turned their noses up at it until they finally gave in and took a taste.  And wouldn't you know it...they ended up liking it.


Mmm...and now I'm hungry.  Great.  Good thing I'll be going to lunch soon!


I'll be back tomorrow with a WWtKW (I haven't played for a few weeks) and hopefully an On Wednesday We Wear Pink post, too!  Thanks for bearing with my slower than usual posting.  It's been a crazy couple of weeks!


Thursday, August 11, 2011

My Favorite Recipes: Chicken Enchiladas


Happy Thursday, Kitchies!  How can the week almost be over?!  It's shaping up to be another busy weekend over here.  Saturday morning we're planning a trip to Jemez Springs or Sandia Peak...kinda depends on the weather.  Then Saturday evening I'm heading out for my first roller derby practice.  And Sunday, we're meeting up with my aunt and uncle for lunch.  They usually make a trip to northern NM during the summer and they always make it a point to stop by and say hi.  I really wish it was my parents who were visiting, but my aunt and uncle will be a good substitute.

As I've mentioned in the last few posts, I have some great recipes to share with you.  I have one of my ultimate favorites today!  It's kinda of a pain in the butt to make, but so, so worth it.  I cannot remember where I got this recipe from but it is my go-to.

Chicken Enchiladas
1 medium onion, chopped
2 4oz cans chopped green chile
2-3 Tbsp melted butter
1 10 3/4 oz can cream of mushroom soup
1 10 3/4 oz can cream of chicken soup
1 1/2 cups chicken broth
12 tortillas
4 boneless, skinless chicken breasts, cooked
1 lb cheddar cheese

Saute onions and chile in butter until tender.  Add soup and broth, blending well.  Simmer 10-15 minutes.  While sauce simmers, soften tortillas by dipping in simmering sauce.  Place small amount of chicken in each tortilla and roll.  Place in greased 9x13 dish.  Pour remaining sauce over enchiladas, top with cheese.  Bake at 350 for 20-25 minutes.

NOTES:  For the chicken, I usually grill it a little beforehand and season it with garlic salt and ground pepper.  You probably don't need to season the chicken because there's plenty of flavor already, but it's what I do.  I usually don't dip the tortillas in the *simmering* sauce because that's not so easy to do without burning the hell out of your fingers; I wait to dip them until after I take the sauce off the heat.  The recipe calls for rolled enchiladas, but you could easily layer them instead.  Also, you don't have to use a can of cream of mushroom and a can of cream of chicken - I usually use two cans of cream of chicken and mushroom.

I could definitely go for some of these for lunch today!  Too bad we're trying to stay away from processed foods...

Since I live in New Mexico, the home of Hatch green chile, I'm not allowed to use canned chile.  That's blasphemy!  I use frozen Bueno green chile instead.

Ooooh man!  I want some of these NOW!!  My mom makes awesome enchiladas, too, but I don't have her recipe.  But, my family likes these, so I think I'm good.

Sorry if I made you hungry...but that's my job.  If you have access to fresh green chile (it's getting to be about that time again!), I highly recommend that over canned.  However, I haven't seen fresh green chile outside of NM, so good luck with that.  *heehee*

Monday, August 1, 2011

Another Win From MBR!

Happy Monday, Kitschies!  Can you believe it's August already?  While I can believe it because it's been so freakin hot, I can't believe it's actually that time of the year again.  In just two weeks, my baby is going to be in Kindergarten!  KINDERGARTEN!!  *sigh*  I'm super excited and super sad all at the same time.  How is it even possible my little boy is in school?!

I have a super YUM recipe to share with you today.  I snagged this recipe from the most beautiful and talented Mrs Bettie Rocker.  I've made this recipe twice and BOTH times I wish I had made more!  Consider yourself warned...

Stuffed Pizza Rolls

1 roll of refrigerated pizza dough
2 Tablespoons Parmesan cheese
1 Tablespoon olive oil (or melted butter)
1/2 tsp garlic powder
1 teaspoon Italian seasoning
mozzarella cheese
your favorite pizza toppings, chopped
marinara sauce for dipping

1. Preheat oven to 400 degrees. Roll pizza dough out to about 12in by 8in, then cut into 24 squares. Fill each square with mozzarella cheese and your favorite pizza toppings toppings.
2. Bring ends together and pinch to form a ball. Place seam side down in a greased pie pan.
3. Brush tops with butter/oil and season with garlic and Italian seasonings.
4. Bake 15-20 minutes or until golden brown. Sprinkle with Parmesan cheese and serve with marinara sauce for dipping. 
 
What I really love about these is you can fill them with whatever you want!  The hubs does NOT do olives, so I made his with pepperoni and green chile.  And the boys had some cheese and some pepperoni and cheese.

I hate my oven.  It cooks very unevenly, so part of the batch got super dark - the other, not cooked enough.  If you check out Becky's post, you can see that her pizza rolls look better.

See what I mean?  *sigh*  I don't care, though...they ALL got eaten.  And I could've easily made another batch and they would've all disappeared, too.

If you haven't already, go check out From the Kitchen of: Mrs Bettie Rocker...she posts some AWESOME recipes and she shares her little boys with us from time to time, also.  She was one of my first blog loves - and my love affair with her continues.

Monday, July 25, 2011

I Was Pushin' It

Happy Monday, Kitschies!  I hope you enjoyed your weekend.  Our weekend was HOT without a drop of rain.  I was hopeful it would rain because I saw some really big banks of thunderheads building to the east and north but we got nuthin!  Most of Albuquerque got rain, and quite a bit of it at that, but Rio Rancho was left out.  It's looking promising for rain again this afternoon but RR will probably get skipped over.  Again.

I have an absolutely delish and easy recipe to share with you today.  I made this the first time a while back and I wasn't sure if the hubs would go for it because there's some stuff in it he refuses to eat.  Well, refused to eat.  So, when I made it, I told him he had to come to the dinner table with an open mind.  In other words: I was pushing it.  LOL  Both he and the boys ate this without fuss - especially when I made it a couple weeks ago.

No-Time Pesto Pasta
1/2 (16-oz.) pkg. penne rigate pasta (3 cups), uncooked
1/2 cup pesto
1/2 cup chopped roasted red peppers
1/2 cup crumbled Feta cheese
 
Cook pasta as directed on package, omitting salt. Drain; return to pan.  
Add pesto and peppers; cook and stir on low heat 3 to 5 min. or until heated through.
Stir in cheese.
 
NOTES:  My hubs is all about the protein, so I added a couple of cooked breasts of chicken, cut up in thin pieces.  I mixed in the cooked chicken with the pesto and peppers.
 
I've never cooked with any of these ingredients (other than the pasta, of course) so I was a little afraid of how it would come together.  But...I like all the ingredients, so I decided to give it a try.

OMGOSH YUM!!  I'm on a whole-foods type diet right now and this looks really, really good.  LOL  Even if I wasn't on this stoopid diet, it would look good! 
 
I found this (and several other) recipes on Kraft Recipes.  I like this site because you can type in individual ingredients of what you have on hand and it'll bring up recipes with those ingredients for you to browse through.  I've tried a number of recipes from Kraft Recipes and I haven't had a stinker yet!
 
So...are there any recipes you were afraid to try but once you did you loved it?  Or a recipe you were sure a family member wouldn't like but they did?  Share them with me!  I'm *always* looking for new recipes to try!!  As always, you can email me at megharmeyer@gmail.com.

Hope you're making it through your Monday relatively unscathed.  It's back to work I go...I have a pile of things needing to be sent out that are staring at me.

Thursday, July 21, 2011

Perfect for a Picnic

Good morning, Kitschies!  I'm at home with Thing 2 today - again.  We got a call from daycare yesterday that he had a fever (over 102*).  He slept away the afternoon yesterday and his fever came down.  He got up this morning and the fever was back (between 102 and 103*), so we're home.  He's not excessively bothered by the fever - not lethargic, not overly whiny or clingy, just has a fever.  And I hope it stays that way (the not being bothered part, not the fever).  So, while he's snacking on a granola bar and (sorta) watching Sesame Street, I thought I'd put together a post for you.

This is a family recipe that I've loved *forever*.  My aunts put together a family cookbook for Christmas one year (as I've mentioned before) and I was so happy to see this recipe in there!  The only drawback?  It's a family recipe, so the measurements aren't exact, but I know how it's supposed to taste, so that's good enough for me.

Momma's Macaroni Salad

Cook 1 pound package of salad macaroni (I use Ditalini) according to instructions on package.  Drain and rinse.

To cooled macaroni, add:
About 1 cup chopped celery
About 1/2 cup chopped sweet pickle
1 large jar diced pimento (4 oz)
1 large can sliced green olives, drained

Mix together then add to the macaroni:
1-2 to 1 cup mayonnaise
2 Tbsp cider vinegar
1-2 Tbsp sweet pickle juice
salt to taste

Adjust salt and vinegar to taste.  Refrigerate to marry flavors.

NOTES:  I don't usually make the full recipe, it's halves easily.  This salad is best if it sits overnight. 

Gather all your ingredients.  Be sure to not get minced green olives - doesn't give the same flavor.  I don't know why, it just doesn't.

YUM!  My hubs doesn't care for this recipe much, neither does my mom, but I love it and so does my dad.  I try to make this every time my parents come to visit.  And it makes a lot (if you use the full recipe), so it's great for parties.

Gah!  Now I'm wanting some of this.  This is one of my favorite family recipes.  And one of my favorite Summer recipes.  Good thing I'm going grocery shopping later this morning!!

As always, please let me know if you use any of my recipes and whether or not you liked it.  I love hearing when people use a recipe I've posted. 

Have a good Thursday!  Hope you're not melting in the heat.  It's been warmer than usual here - upper 90s AND it's been more humid, too.  We finally got some rain last night (that shut us out of the baseball game) so while it's a bit cooler this morning, it's more humid.  Yuck!

Tuesday, July 5, 2011

Friends Are Like Recipes

Good morning, Kitschies!!  I hope you enjoyed your 4th of July weekend.  We didn't do fireworks last night and I'm a little disappointed about that.  I don't ever remember not seeing fireworks for the 4th.  Ever.  There's always next year, right?  Hopefully we'll get more rain by this point next year and we'll be able to have more access to the sparklies in the sky.  We did, however, give the boys some of those little poppers you throw on the ground.  They had so much fun with those!

I've given y'all 3 manis over the holiday weekend (in case you missed them, here are the links for those: #1, #2, #3), so it's time for some food! 

Back in May (?) I needed a recipe for a main dish to bring to the office for a potluck.  I couldn't think of anything so I put the question out to my peeps in Facebook land.  I got lots of great suggestions and this one topped the list, even though it wasn't the recipe I used for the potluck.  I did, however, make this for the family a few weeks ago.  This great recipe came from my old high school friend, Charles.  If he cooks like this all the time for his new wife, she's a lucky lady!

Friends are like recipes; they're great to have around and it's always fun to find new ones.

Almond Chicken
6 skinned and boned chicken breast halves
1/8 tsp salt
1/8 tsp black pepper
3 Tbsp butter, divided
1 1/2 cups whipping cream
2 Tbsp orange marmalade
1 Tbsp Dijon mustard
1/8 tsp ground red pepper
1 cup package of sliced almonds, toasted

Flatten out the chicken halves to about a 1/4 inch thickness.  Sprinkle with salt and pepper. Melt 1 1/2 tablespoon butter in a large skillet over medium-high heat.  Add half the chicken and cook 2 minutes on each side or until golden brown. I find you may need to use a lot more butter for this. Remove the chicken from skillet.  Repeat procedure with the remaining butter and chicken. When finished, remove the chicken, reduce heat to medium, add whipping cream, orange marmalade, Dijon mustard and ground red pepper, stirring well. Add chicken, sprinkle with almonds, and cook 8 minutes or until sauce thickens. Should yield 6 servings.

NOTES:  I flatted chicken by covering in plastic wrap first.  I tried using parchment paper but that did not work by any stretch of the imagination.  LOL  I used non-stick cooking spray rather than butter but I did add a little butter in with the whipping cream.  I couldn't find toasted almonds so I toasted them myself (oooh...amazing, I know).

This isn't a very good picture, but trust me, this is some good stuff!!  Nate pitched a little fit because "I don't like nuts" but after he got over it, he ate it all...and so did Mason.  Good stuff!

A *big* thank you to my friend, Charles, for this great recipe!  Definitely a make-it-again recipe for my family.

Monday, June 27, 2011

Hot Enough For Ya?

Happy Monday, Kitschies.  Well, as happy as a Monday can be.  Anyway...it was a hot one here in New Mexico over the weekend.  We don't usually reach over 100* but for the last 3 or 4 days, it's been HOT!  At least it's a dry heat.  And I mean that in all seriousness - because it really does make a difference.  Saturday evening we went to a graduation party - outside.  Sunday I took the boys to a play place inside one of the malls because they needed to get out of the house and it's too hot to sit and watch them at the park.  The best and her kids joined us for both occasions which made them both a bit more bearable.

Since it's nice and hot out lately, I thought I'd share a delish spicy recipe with you today.  I found this on Food Network (courtesy Rachel Ray) while looking for a new spicy chicken recipe to try.  The amount of heat this dish has is variable depending on your taste.


Spicy Thai Chicken

2 cups jasmine rice, prepared to directions on the package
1 1/2 pounds boneless, skinless chicken breast
1 tablespoon (1 turn around the pan) wok or light colored oil
1 tablespoon hot chile oil
1/2 to 1 teaspoon crushed red pepper flakes
1 small to medium onion, thinly sliced
2 red bell peppers, seeded and thinly sliced
4 cloves garlic, chopped
2 tablespoons (2 turns around the pan in thin stream or 2 splashes) fish sauce
20 leaves fresh sweet basil, torn

Place rice on the stove top to cook.

Cut chicken on an angle across the breast into thin strips. Cut strips across into bite size pieces. Set chicken aside. Wash hands and cutting board.

When the rice is 6 or 7 minutes away from being done, begin your stir fry.

Heat a wok, wok shaped skillet, or large nonstick skillet over high heat. When the pan smokes, add wok or light cooking oil, and hot chile oil. Sprinkle in crushed pepper flakes. Add chicken and stir fry 2 minutes. Add onions, red bell peppers, and garlic and stir-fry for 1 or 2 more minutes. Add fish sauce. Remove the pan from heat and add basil. Toss chicken dish until basil wilts.

Serve chicken and peppers with prepared rice, salad with peanut dressing.

NOTES:  I found this to take longer than the 6 or 7 minutes as this suggests.  You can add more or less of the hot chile oil depending on how spicy or how mild you prefer your food.  I like it HOT!


I think I'm going to have to make this recipe again sometime soon.  It was pretty easy to make and the hubs and I liked it.  We spared the boys and made them chicken because I think this would've been just a bit too spicy for their little mouths.

Just an FYI...I'm putting together some things for a giveaway very soon.  It's going to have two parts: something for the foodies and something for the beauties.  Hope you survive your Monday!  Check back often for my Super Summer Giveaway!

Tuesday, June 21, 2011

Silence That Sweet Tooth

Good morning, Kitschies!  And happy Summer to you!  Can you believe it's already the middle of the year?  It is officially the first day of Summer and the longest day of the year.  I remember, as a kid, being mad about having to go to bed when it was still light out.  Now I get that same complaint from Nate.  Oh, it's rough being a kid.

Speaking of being a kid, this recipe kinda reminds me of that.  It's super easy and super rich and pretty sweet.  Got a sweet tooth?  This will definitely kill your sweet craving!  I can't eat a whole cup - but I bet Nate could (if I let him)!  I found this recipe one day while surfing blogs and now I can't remember which one I went to and, of course, I can't find it now.  But, I found the same recipe on another site. 

Nutella Mug Cake

4 Tbsp self rising flour
4 Tbsp sugar
1 egg
3 Tbsp unsweetened cocoa powder
3 Tbsp Nutella
3 Tbsp milk
3 Tbsp olive oil or vegetable oil

Combine all ingredients in a large coffee mug.  Whisk well with a fork until smooth.  Microwave on high 1 1/2 to 3 minutes.  Top with whipped cream, chocolate sauce or whatever else you'd like.

NOTE:  Use a LARGE coffee mug - it will overflow if you use a regular mug.  To make self rising flour, add 1 tsp baking powder and a pinch of salt to all-purpose flour.  Cooking time varies depending on the wattage of your microwave.  Mine only took 1:45.

Apparently, the recipe I found called for an egg.  You can probably omit it without problem, but I think it makes the cake more moist and less microwave-y.

Here's a mug size comparison.  I used a mug that my grandma gave me for soup.  It's gigantic and the perfect size for a mug cake!

Looking at this picture makes my teeth hurt!  And I say that in the best way possible.  LOL  We didn't have any whipped cream or chocolate sauce, so I ate it plain.  Could you imagine this with caramel sauce on top?  OMGosh.  Now I want one of these for dinner tonight.  *giggle*

What's your favorite thing (pre-made or recipe) to cure your sweet tooth?

Tuesday, May 31, 2011

Happy Monday! Wait. Tuesday. Whatever.


Good morning, Kitschies!!  I was going to say something about it being Monday and all, but seeing as it's Tuesday, I guess that doesn't work.  My docs (aka: the bosses) have been out since Thursday and I've (basically) been out since Friday, so it's an *extra long* holiday weekend for me.  Especially since I'm taking today off to take Nate to Explora!  We've been there before but it's been a long time (I was still pregnant with Mason)...it should be fun.

We had a good holiday weekend.  We had our cousins over to spend the night Friday night.  The boys stayed up and played video games (the hubs and the older cousin stayed up til after midnight!) then got up bright and early and hit Lowe's for their Build & Grow program where all three of them got to build a by-plane!  Then we all hit the park and then came home for some lunch and pool time.  After a few hours, we were all a little pinker (the top of my feet got it worst!) but we had a good time.  I *finally* found a place in Albuquerque that sells tri-tip (if you know me, you know this is a BIG deal) and I made the BEST tri-tip I've ever made (also a big deal).  Other than that, we got some cleaning done around the house and talked about Mason's birthday party this coming weekend (he'll be 2 *gasp* on Thursday).  I think *all* weekends should be 3-day weekends!! 

Anyway...I have a great recipe to share with you today.  I was in the mood for a new pork recipe and did some searching and found a good one on Simply Recipes.  

1 teaspoon ground cumin
1/2 teaspoon salt
1/2 teaspoon freshly ground pepper
1/2 pound boneless pork loin, cut into 2x1/2-inch strips
1 Tbsp vegetable oil
2 cloves garlic, minced
1 cup chicken broth
1/2 cup orange juice
2 Tbsp cider vinegar
1/2 Tbsp brown sugar
2 medium carrots, sliced
1 Tbsp corn starch
1/2 cup sliced green onions
1/2 pound egg noodles, cooked, drained

Get the water boiling for your noodles...

In a small bowl combine cumin, salt and pepper. Add pork; toss to coat.

In a large skillet heat oil over medium high heat. Add the pork and garlic. Sauté for 2 minutes or until browned.

In a small bowl blend the broth, orange juice, vinegar, and brown sugar. Reserve 1/4 cup of the broth mixture. Pour all but the reserved broth mixture into the skillet with the pork and garlic. Add the carrots. Bring to a boil and reduce the heat to medium. Cook 7-8 minutes.

Blend corn starch into reserved broth mixture. Stirring constantly, pour the corn starch mixture into the skillet to thicken the sauce. Add the green onions. Bring to a boil and simmer for 1 more minute.

Toss with the noodles. Serve immediately.
Serves 4.


For once, the pic I got looked pretty similar to the pic they used on the site!  This was soooo good.  You could easily substitute chicken for pork if pork isn't your thing.  The boys even ate this without dispute (save for the obligatory 10 minutes of Nate complaining that he doesn't want to eat *that*). 

Well, it's after 7 and Nate is still in bed...I wonder how long he'll sleep?  I miss the days of sleeping in til whenever...but those days are long gone with the kiddos.  Especially now that Mason is in a toddler bed!  All I can say is: thank jeebus for child-proof doorknob covers!  I know...I'm a mean mom.

Monday, May 16, 2011

A Winner of a Chicken Dinner

Happy freakin' Monday, Kitschies.  I'm off work today because I still feel like warmed over death AND I don't have a voice anyway, so I wouldn't be much use at work.  Not to mention I don't have *any* energy.  I thought I was getting better yesterday and did quite a bit around the house and that might be part of the reason I feel worse today than yesterday.  I have an appointment with one of the providers at work later this morning - I don't like to take medication, but I've felt like poo for 4 days and it's not getting better, so I think it's time for some sort of intervention.  Oh, and I just realized that Blogger did dump one of my posts from Wednesday, so I have to get re-posted again some time soon.  Enough of my moping...on to the post, shall we?

I've been *really* bad about getting my pics prepped for the blog.  I have tons of manis prepped, which is good for the blog, but I've been really slacking on the recipe end.  So, I finally sat down for a while this weekend and got a bunch finished...I still have a bunch to go, but I made a pretty good dent.  This is one of my favorite, super-easy recipes.  I don't remember where I got this originally (kraftrecipes, maybe?), but it's a go-to when I don't know what else to make.

Cheesy Chicken & Rice Bake
1 can cream of chicken soup
1 1/3 cup water
3/4 cup uncooked regular long-grain rice
1/2 tsp onion powder
1/4 tsp ground black pepper
1 1/2 b boneless, skinless chicken breast halves
1 cup shredded Cheddar cheese

Mix soup, water, rice, onion powder and black pepper in a 2-quart shallow baking dish.  Top with chicken.  Sprinkle chicken with additional pepper.

Cover and back at 375* for 45 minutes, or until chicken is no longer pink and rice is cooked.

Uncover.  Sprinkle cheese over chicken.

NOTES:  I usually throw the dish back in the oven for about 5 minutes to melt the cheese.

Mmmm!  More cheeses pleases meeses!    YUM!

So, so simple and the kids eat this without any coaxing.

Update.  So. I  went to see one of the nurse practitioners I work with and she diagnosed me with an upper respiratory infection and a mild ear infection.  Nice.  So, 3 prescriptions later, I'm on the road to wellness.  And, on top of having zero energy, I get a call from daycare saying that Thing 2 has diarrhea and that we have to go pick him up.  *sigh*  When it rains, it pours, right?  I'm gonna go relax next to Mason while he watches Toy Story 3...good think I haven't already seen that movie eleventybillion times already.

One more thing.  I'm a guest writer over at just Lu today - giving a refresher course on CPR as a Housewife MacGyver.  Come over and visit, won't ya?

Tuesday, April 26, 2011

Easy Cheesy

Good day, Kitschies!  I hope you enjoyed Easter without too much of a sugar coma.  I have some great pics from Easter but I've been super duper busy and haven't had time to do much of anything other than the necessities (at home AND at work), so I'll post Easter pics soon. 

I've been a bad blogger the last couple days...but I have a good reason for that.  My co-worker is out for the next 2 weeks (!) to spend time with her daughter, SIL and her brand new grandson!  I'm so excited for her but that means I'm by myself at work to cover both docs and to say that it gets busy is an understatement.  So, if I'm not commenting on your blog as often as usual, of if you don't see as many posts from me as usual, don't think I've ran away.  I will check blogs as time permits and I will squeeze in a post as often as I can. 

It's lunchtime here at the clinic and it's pretty quiet.  I can smell lunch in the break room (thank jeebus for drug reps) and instead of sitting back there and chatting it up, I decided I'd sit here with you and share a recipe with you.

I don't know if you've seen these at the grocery store, but every time I go down the spice aisle, I stop by the McCormick Recipe Inspiration section.  I have a lot of spices, but I don't have them all.  And I don't want to buy an entire new spice for one recipe.  That's where these little kits come in handy.  Each pack has pre-measured, individually packaged spices in the amounts specific to the recipe which is included on a recipe card on the back.  Simple, right?  Right.  I picked up this pack months ago, I just never have the recipe on hand to share with you.  I finally found it online, so now I can!

Quesadilla Casserole 
by McCormick Recipe Inspirations
2 tsp chili powder*
1 tsp ground cumin*
1 tsp minced garlic*
1/2 tsp dried oregano*
1/2 tsp crushed red pepper flakes*
1 lb ground beef
1/2 cup onion, chopped
16 oz tomato sauce
15 oz can pinto beans, drained
8.75 oz can corn, drained
4.5 oz chopped green chile, drained
6 flour tortillas
2 cups shredded Cheddar cheese

*included with pack

Brown beef and onion in large skillet on med-high heat; drain. Add tomato sauce, beans, corn and green chiles; mix well. Stir in all of the spices except Red Pepper. Bring to boil. Reduce heat to low; simmer 5 minutes. Add Red Pepper to taste, if desired.

Spread 1/2 cup of the beef mixture on bottom of 13x9x2-inch baking dish sprayed with no-stick cooking spray. Top with 3 of the tortillas, overlapping as needed. Layer with 1/2 of the remaining beef mixture and 1/2 of the cheese. Repeat with remaining tortillas, beef mixture and cheese.

Bake at 350F for 15 minutes or until heated through. Let stand 5 minutes before serving.

NOTES:  I didn't have pinto beans on hand so I used black beans instead.  

Pre-measured and just what I needed for this recipe.  Just be sure to look at all the needed added ingredients - I usually forget to look and end up making a run for the store when I should be making dinner!

It *looks* good, but it was a little bland for my taste.  I'll definitely be adding some more spices when I make this again.  My Mom says it's because I live in New Mexico now and have singed off all my taste buds with all the green chile we eat.  LOL  And if I remember correctly, Nate ate his helping...don't remember if Mason did, or even if he was eating table foods at this point.  Either way, I will be making this again.  It's fast and it tastes pretty good (with added spices, of course). 

OK...gotta get back to work.  I hope you enjoy the rest of your day.  As a parting gift...THIS is what I'm listening to at work at the moment.  Love this song...fast forward to a little after a minute to really get in to it.

Tuesday, April 19, 2011

Goin' Bananas

Good afternoon, dear Kitschies!  It's another beautiful day here in the Land of Enchantment and I'm stuck inside at work.  Not that I'm complaining about work...but it would be wonderful to be outside enjoying the gorgeous spring weather. 

At the Harmeyer homestead, we've been known to go through a bunch or two of bananas faster than they hit the table.  However, the last couple weeks it's been so busy we haven't been eating at home like we usually do.  The hubs noticed that we had a few bananas that were on their way out so he challenged me to find something to do with them.  Challenge accepted, I say.  Challenge accepted.  I didn't want to do the usual banana bread, so I hopped on Allrecipes and quickly found a recipe to try. 

Banana Drops
2 1/2 cups all-purpose flour
1/4 tsp baking soda
1/4 tsp salt
7/8 cup brown sugar
1/4 tsp ground cinnamon
1/2 cup butter
1/4 tsp vanilla extract
1/4 tsp banana extract
2 eggs
3 ripe bananas, mashed
1/3 cup chopped walnuts (optional)

Preheat oven to 400 degrees F (200 degrees C). Line a cookie sheet with parchment paper.

In a medium size mixing bowl, sift together flour, baking soda and salt. In a separate small bowl, combine 2 tablespoons brown sugar with cinnamon, set aside. 

In a medium size mixing bowl, beat together 3/4 cup brown sugar with the butter or margarine, vanilla and banana extract until the mixture is light in texture. Beat in the eggs. Mix in the banana. Slowly mix the flour mixture into the egg, banana and sugar mixture. Fold in nuts. Drop the dough by teaspoonful onto the prepared cookie sheet. Sprinkle the cookies with the mixture of brown sugar and cinnamon prepared earlier. 

Bake 8 to 10 minutes, until lightly browned.


NOTES:  I didn't have banana extract, but I did have banana liqueur; it worked perfectly.  And forget parchment paper!  I use my Silpat silicon baking mat that my cousins gave me for Christmas.

They don't look like much before they get all toasty warm in the oven, but trust me, they puff up perfectly.

Caught in the act!  Yeah, that's Mr Nate's hand.  "I just wanted to taste some of the sugar."  Nice.

Speaking of Mr Nate, I had a helper for this endeavor.  Nate always has so much fun helping me - pouring ingredients in the bowl, scraping the sides of the bowl.  Now if I could only get him to help me clean up the kitchen when we're finished!

I don't know what he was doing, but it looks like he was throwing gang signs.  *sigh*  That's my boy!

Here they are!  They were like little mini banana breads - not too sweet.  I forgot to mention that I didn't add any nuts.  I brought some of these to the office and they were GONE before I even got back to have one for myself.

What do *you* do with over-ripe bananas?  I'm on a constant search for the *perfect* banana bread. *hinthint*