Showing posts with label white. Show all posts
Wednesday, October 3, 2012
Randomness
*peeks out* Hey, there Kitchies! How the heck are ya?! I've been busy (yeah, shocker. I know.) I thought I'd take a few minutes and share some random manis with you today! Ready? I have no idea when I wore any of these. Sorry about that.
This is one my top 10 favorite polishes. Revlon Royal is a gorgeous, squishy royal blue jelly. I made it jelly sammich with Jordana Pixie Pink glitter. I loved this!
I caught flakey madness like everybody else did when Finger Paints released their flakey collection. This is Orly Charged Up with Finger Paints Twisted. You can't go wrong with a good flakey polish, but this mani was just kinda meh to me.
Zoya Faye. I want to love this. Really, I do. But I just...don't. I want the rosy purple to show through more. Most of the time, all you can see is the bright gold glass flecks. It is a pretty polish in theory. Just give me a *little* more purple...please.
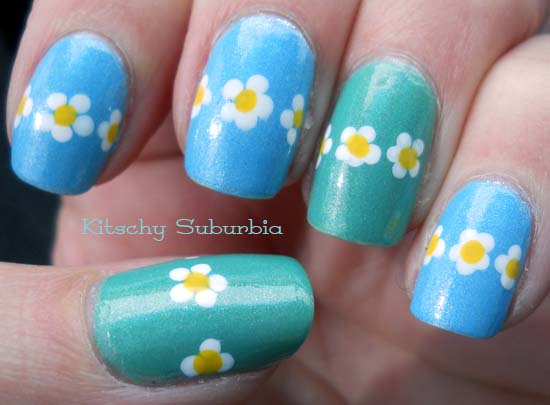
This was better in my head than it was on the nail. The green is Sinful Colors Mint Apple. I don't remember what the blue is, but it's a pretty sky blue with just a touch of shimmer. Maybe a Milani? Yep. I'm pretty sure it's Milani Beach Front. The flowers are Milani White on the Spot and Yellow Whiz (worst. polish name. ever.).
I don't usually like white nails because they're so stark. But, when you pair it with a pretty glitter and make it a gradient, it's a win for me! This is Milani White on the Spot with Fuchsia Jewel FX. I say I don't like glitter because it's such a PITA to remove, but looks like I use it pretty often when you lump manis together like this.
There ya go! Hope that holds you over for a little while. Sorry I've been so sporadic with posting - life doesn't slow down anymore. Be back soon...?
Tuesday, December 20, 2011
I'm Going Dotty!
Good morning, Kitschies! It's been a whirwind couple of days. We've been so busy with Christmas prep and holiday parties, I haven't had time to sit down and blog! Don't worry, though...I've still been doing my nails. Wait. I take that back. For my office Christmas party, I had one coat of a holo topcoat and that was it. That's just not right.
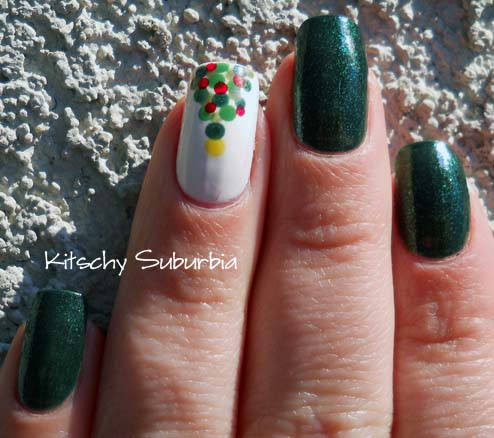
Earlier last week (or maybe it was the week before), I saw this cute little dotty tree on Simply Rins. She does the best nail art and they're usually pretty fool-proof! As soon as I saw this, I knew I had to give it a go. And wouldn't you know it...it *was* pretty much fool-proof. :)
I started with a base of ChG Glittering Garland (2-3 coats, depending on how careful I was with application) for all but the accent nail where I used Finger Paints Paper Mache.
To create the tree, I used a couple dotting tools, some greens, a red and a yellow.
The greens: ChG Glittering Garland, ChG Starboard, Zoya Gemma. Yellow: Let's Meet. Red: Zoya Sooki (that's been my go-to red this holiday). See the pinky? Yeah. I should've gone with 3 coats there.
If you click on this pic, you can appreciate the flecks in Garland and you can see the tree in better detail. See? This is a pretty fool-proof design. It didn't take but a few minutes and it's CUTE!!
So, now that it's December 20th...are you read for Christmas? I know I'm not! I still have some wrapping to do and I have to make my way to the grocery store to get the makings of a sour cream fruit salad (I know it sounds gross but totally isn't - trust me) and the hubs has decided we're having his dad over for Christmas dinner so I guess we need to figure out what we're making. *sigh* As much as I like shopping, I abhor the grocery stores any time after 5pm.
Earlier last week (or maybe it was the week before), I saw this cute little dotty tree on Simply Rins. She does the best nail art and they're usually pretty fool-proof! As soon as I saw this, I knew I had to give it a go. And wouldn't you know it...it *was* pretty much fool-proof. :)
I started with a base of ChG Glittering Garland (2-3 coats, depending on how careful I was with application) for all but the accent nail where I used Finger Paints Paper Mache.
To create the tree, I used a couple dotting tools, some greens, a red and a yellow.
The greens: ChG Glittering Garland, ChG Starboard, Zoya Gemma. Yellow: Let's Meet. Red: Zoya Sooki (that's been my go-to red this holiday). See the pinky? Yeah. I should've gone with 3 coats there.
If you click on this pic, you can appreciate the flecks in Garland and you can see the tree in better detail. See? This is a pretty fool-proof design. It didn't take but a few minutes and it's CUTE!!
So, now that it's December 20th...are you read for Christmas? I know I'm not! I still have some wrapping to do and I have to make my way to the grocery store to get the makings of a sour cream fruit salad (I know it sounds gross but totally isn't - trust me) and the hubs has decided we're having his dad over for Christmas dinner so I guess we need to figure out what we're making. *sigh* As much as I like shopping, I abhor the grocery stores any time after 5pm.
Labels:
China Glaze,
Finger Paints,
green,
mani,
nail art,
white
Monday, October 31, 2011
It's Pronounced Fronkensteen
Happy Halloween, Kitschies!! I have a compilation post for you today of all the Halloween inspired manis I've worn over the last week or so.
But...before I begin...a clip from one of my all-time favorite movies - Halloween or otherwise.
There is no more magical connection that Mel Brooks, Gene Wilder and Cloris Leachman!
Anyway...on with the polish! All pictures are click-able to make big-able. :)
These were my first two in my Halloween sets. I started with a base of WnW Black Creme then I used two coats of ChG Ick-a-Bod-y from the Awakening collection (Fall 2010). This gave me the effect I was looking for but I was a little disappointed because the orange glitter is a little chunky and made the finish a little rough. That's just me being a little over critical. The orange glitter is a perfect color.
Next up is Franken Fingers. LOL I started with 3 coats of Kermit with a Twist, a great franken creation from DragonRhi Creations. It's a pretty apple green base with darker green and gold glitter. I got this one is a box of franks from Chris and I don't know why I waited so long to use it. It's so pretty and wears like iron. Using my black striping polish, I created little Frankenstein stitches on each of my fingers. This is the mani I wore to the derby championships last weekend.
Speaking of derby championships, you saw the whole look in THIS post, but here's a better full-face pic of me that night.
I went with a green eye theme to match my nails.
Next up are my mummy accent nails. I used Ulta Underground on 3 of the nails and ChG White Out on the accent nails. Then using my black striping polish, I created "bandages" and I used yellow acrylic paint for the eyes. I ended up doing this just on the left hand because I was too heavy-handed to do good looking bandages on the right hand. And ignore the smearing of the black stripes - stoopid striping polish smears no matter how long I wait to put on top coat.
This is what I wore for the end of the week last week and through most of the weekend. This is Zoya Tanzy (from the Sunshine collection, Summer 2011). What I like about Tanzy is that it has a bright orange color but there's lots of gold glass fleck in there, too. I painted little flowers toward the tips of my nails using black acrylic paint and Tanzy as the center of the flowers. Somehow, this ended up kinda looking like leopard print, but I knew they were flowers and that was good enough for me. LOL
Last but not least, this is what I'm wearing for Halloween. I used two coats of WnW Black Creme and then I sponged on a few coats of ChG Zombie Zest (also from the Awakening collection, Fall 2011) using a makeup sponge, just on the tips.
I really liked this one because the slime-green glitter on the tips makes the black base almost look like a super deep green (think Nars Zulu). I don't know what made me think of doing this look...it just kinda popped in to my head on Sunday afternoon. I think it's a good end to two weeks' of Halloween manis!
Whatever you do for Halloween, be safe! Keep an eye on the little ones - they're super crazy tonight. I'll have pix of my little guys in a few days. Happy Halloween!!!
But...before I begin...a clip from one of my all-time favorite movies - Halloween or otherwise.
There is no more magical connection that Mel Brooks, Gene Wilder and Cloris Leachman!
Anyway...on with the polish! All pictures are click-able to make big-able. :)
These were my first two in my Halloween sets. I started with a base of WnW Black Creme then I used two coats of ChG Ick-a-Bod-y from the Awakening collection (Fall 2010). This gave me the effect I was looking for but I was a little disappointed because the orange glitter is a little chunky and made the finish a little rough. That's just me being a little over critical. The orange glitter is a perfect color.
Next up is Franken Fingers. LOL I started with 3 coats of Kermit with a Twist, a great franken creation from DragonRhi Creations. It's a pretty apple green base with darker green and gold glitter. I got this one is a box of franks from Chris and I don't know why I waited so long to use it. It's so pretty and wears like iron. Using my black striping polish, I created little Frankenstein stitches on each of my fingers. This is the mani I wore to the derby championships last weekend.
Speaking of derby championships, you saw the whole look in THIS post, but here's a better full-face pic of me that night.
I went with a green eye theme to match my nails.
Next up are my mummy accent nails. I used Ulta Underground on 3 of the nails and ChG White Out on the accent nails. Then using my black striping polish, I created "bandages" and I used yellow acrylic paint for the eyes. I ended up doing this just on the left hand because I was too heavy-handed to do good looking bandages on the right hand. And ignore the smearing of the black stripes - stoopid striping polish smears no matter how long I wait to put on top coat.
This is what I wore for the end of the week last week and through most of the weekend. This is Zoya Tanzy (from the Sunshine collection, Summer 2011). What I like about Tanzy is that it has a bright orange color but there's lots of gold glass fleck in there, too. I painted little flowers toward the tips of my nails using black acrylic paint and Tanzy as the center of the flowers. Somehow, this ended up kinda looking like leopard print, but I knew they were flowers and that was good enough for me. LOL
Last but not least, this is what I'm wearing for Halloween. I used two coats of WnW Black Creme and then I sponged on a few coats of ChG Zombie Zest (also from the Awakening collection, Fall 2011) using a makeup sponge, just on the tips.
I really liked this one because the slime-green glitter on the tips makes the black base almost look like a super deep green (think Nars Zulu). I don't know what made me think of doing this look...it just kinda popped in to my head on Sunday afternoon. I think it's a good end to two weeks' of Halloween manis!
Whatever you do for Halloween, be safe! Keep an eye on the little ones - they're super crazy tonight. I'll have pix of my little guys in a few days. Happy Halloween!!!
Thursday, October 27, 2011
Fade to Black
Good morning, Kitschies. It's a dreary, cold Thursday over here in my neck of the woods. You know the kind of day...a day where all you want to do is hide under the covers with a good book or a warm body and lay there...all...day. I'm flying solo today here at work, so it's probably going to be a short post.
To sort of reflect that dreariness outside today, I have an equally dreary (color-wise) mani to share with you today. But first, a little explanation as to the inspiration for this one. I was in a mood to do a sponge gradient so I sat down with a bunch of colors and turned on Douche Bagans and the crew of Ghost Adventures. Say what you will about ghost hunting shows (yes, I know, most of that shite can be disproved, but whatev), but they're good to have playing in the background when I'm doing stuff like doing my nails and want to have background noise. Anyway...they were doing a lot of work with black and white video and then it came to me. Black to white gradient!
After getting the bugs out with my You're Fired! sponging gradient, I had a better idea of what to do with this one. I started at the tips with Zoya Raven then sponged ChG Recycle and finished with SH White On.
To finish it off and maybe make it a bit more mystical (yeah, right), I added a layer of ChG Fairy Dust for a little sparkle.
The faded effect didn't turn out as strong as I'd have liked, but I still like the end result. Have you tried a sponge gradient before? What colors do you go to first? Any tips for a beginner sponger like myself?
Alright. I must get to gettin'. It's shaping up to be a busy-ish day here at the clinic - but nothing that I can't handle. Me strong like bull.
To sort of reflect that dreariness outside today, I have an equally dreary (color-wise) mani to share with you today. But first, a little explanation as to the inspiration for this one. I was in a mood to do a sponge gradient so I sat down with a bunch of colors and turned on Douche Bagans and the crew of Ghost Adventures. Say what you will about ghost hunting shows (yes, I know, most of that shite can be disproved, but whatev), but they're good to have playing in the background when I'm doing stuff like doing my nails and want to have background noise. Anyway...they were doing a lot of work with black and white video and then it came to me. Black to white gradient!
After getting the bugs out with my You're Fired! sponging gradient, I had a better idea of what to do with this one. I started at the tips with Zoya Raven then sponged ChG Recycle and finished with SH White On.
To finish it off and maybe make it a bit more mystical (yeah, right), I added a layer of ChG Fairy Dust for a little sparkle.
The faded effect didn't turn out as strong as I'd have liked, but I still like the end result. Have you tried a sponge gradient before? What colors do you go to first? Any tips for a beginner sponger like myself?
Alright. I must get to gettin'. It's shaping up to be a busy-ish day here at the clinic - but nothing that I can't handle. Me strong like bull.
Labels:
black,
China Glaze,
gradient,
gray,
mani,
nail art,
Sally Hansen,
white,
Zoya
Thursday, October 20, 2011
Inspiration
Good day, Kitschies! I hope your week is flying by and you're as productive as you want to be. I did not want to come in to work today. Not at all. And for good reason. It's super-de-duper slow today. Like, we had six patients between two doctors this morning. *yawn* Luckily the afternoon has filled in a bit and it looks like I'll actually have something to do. In the meantime, I decided to give you a post.
I finally sat down last night and prepped pictures. I now have enough pics for 10 posts. 10 posts! And I'm still not caught up! ANYWAY...I have had this mani sitting in my pending folder for months. I was inspired by a (ex)coworker's scrub top. I find inspiration in the strangest places sometimes.
I started with a base coat of ChG For Audrey then I water marbled that with ChG Goin' My Way (brown) and SH White On.
Wow. I'm horrible at taking pics of my right hand. LOL I like how this marble came out pretty consistent - with the exception of my right thumb.
My left thumb pattern was my fave out of the group.
And, in contrast, the right thumb was my least favorite. You can't win them all, right? LOL
Here's a little better pic of my right hand. Good thing I don't have to take pics of that on a regular basis!
And a pretty sunlight pic for you.
I know I say it every time, but I think this is my favorite marble to date. I have another marble hanging out in the pending folder - I'll get to it eventually.
I want to do another marble (maybe for Halloween?) but I'm horrible at pairing/matching colors. So, here's your homework: give me color combos to try!! Please!
I'm off to eat lunch. Hope you have a fantabulous day. I'll be back soon with some Friday Confessionals. It's been a while!
I finally sat down last night and prepped pictures. I now have enough pics for 10 posts. 10 posts! And I'm still not caught up! ANYWAY...I have had this mani sitting in my pending folder for months. I was inspired by a (ex)coworker's scrub top. I find inspiration in the strangest places sometimes.
I started with a base coat of ChG For Audrey then I water marbled that with ChG Goin' My Way (brown) and SH White On.
Wow. I'm horrible at taking pics of my right hand. LOL I like how this marble came out pretty consistent - with the exception of my right thumb.
My left thumb pattern was my fave out of the group.
And, in contrast, the right thumb was my least favorite. You can't win them all, right? LOL
Here's a little better pic of my right hand. Good thing I don't have to take pics of that on a regular basis!
And a pretty sunlight pic for you.
I know I say it every time, but I think this is my favorite marble to date. I have another marble hanging out in the pending folder - I'll get to it eventually.
I want to do another marble (maybe for Halloween?) but I'm horrible at pairing/matching colors. So, here's your homework: give me color combos to try!! Please!
I'm off to eat lunch. Hope you have a fantabulous day. I'll be back soon with some Friday Confessionals. It's been a while!
Labels:
brown,
China Glaze,
mani,
mint,
nail art,
Sally Hansen,
water marble,
white
Monday, July 4, 2011
Happy 4th of July - Version 3.0
Happy Independence Day!! I hope you are enjoying a day with family and friends today. We spent a good evening with friends last night and me and the boys (hubs included) are hanging out together today. It's pretty dang hot here and the boys spent some time in our little wading pool and now I'm cooling off and putting together this quick post to show off my 3rd of 3 patriotic manis (#1 HERE, #2 HERE)...and I think I save the best for last!
A couple weeks ago I saw a splatter mani on The PolishAholic. I did my first splatter mani (which I'll post soon-ish) with a black base and blue and purple splatters. And I couldn't pass up doing it for the 4th!
I started off with two coats of ChG White on White then I splattered ChG Frostbite (blue) and Zoya Alix. I had some issues with my first splatter mani, but I got it down this time! This pic was taken outdoors in filtered sunlight (there was a lot of smoke in the air - that's why my skin looks more orange than usual).
Ah...the standard sub-par pic of my right hand. LOL Of all my patriotic manis, I think I liked this one the best! I know I said it before, but I really don't care for ChG White on White. It seems to chip pretty easily, at least easier than my go-to SH White On.
How are you celebrating your 4th of July? We'll be BBQing some tri-tip tonight but we won't be doing fireworks. It's waaaay too dry here and the fireworks are hard to find at the moment. Have a safe 4th!
A couple weeks ago I saw a splatter mani on The PolishAholic. I did my first splatter mani (which I'll post soon-ish) with a black base and blue and purple splatters. And I couldn't pass up doing it for the 4th!
I started off with two coats of ChG White on White then I splattered ChG Frostbite (blue) and Zoya Alix. I had some issues with my first splatter mani, but I got it down this time! This pic was taken outdoors in filtered sunlight (there was a lot of smoke in the air - that's why my skin looks more orange than usual).
Ah...the standard sub-par pic of my right hand. LOL Of all my patriotic manis, I think I liked this one the best! I know I said it before, but I really don't care for ChG White on White. It seems to chip pretty easily, at least easier than my go-to SH White On.
How are you celebrating your 4th of July? We'll be BBQing some tri-tip tonight but we won't be doing fireworks. It's waaaay too dry here and the fireworks are hard to find at the moment. Have a safe 4th!
Saturday, July 2, 2011
Happy 4th of July - Version 2.0
Happy Saturday!! And for a lot of you, happy 3-day-weekend!! You get a bonus Saturday post from me today. It's getting pretty warm outside and it's stinkin' smokey, so I'm hiding out indoors today.
I did this mani earlier this week in preparation for Independence Day. This is my second of 3 patriotic manis for the holiday. The first can be found HERE. This isn't my best water marble, but I liked the distribution of colors, so it's not a total loss.
I started with a base coat of ChG White On White then marbled using ChG White On White, ChG Frostbite and Zoya Alix. This is my left hand. It took me a while to realize that I was using too much white, so it's more like white, red and blue on this hand.
Here's my left thumb. This is where I started using one ring of white to two each of red and blue. I like the balance better here.
This is my right hand. I hate taking pics of my right hand! Anyway, if you compare the right to the left, you can see how much white there really was on my right hand.
Here's a little better view of my right thumb. All in all, I was happy with this marble, though I don't know if it's the white (it may be a little old) or what, but this marble didn't last very long. I'm wearing this same white today - only 1 day in to a new mani - and it's already chipped. I think I'm going to go back to my good 'ol standby white (SH White On).
This is my favorite finger of the set - pinkie on my right hand. I like the balance of the colors and the symmetry of the pattern. And I can't tell if that's a small bubble in the middle or just an artifact created by the flash, but it wasn't as obvious IRL.
Thanks for hanging out with me for a bit today! I'll be back on Monday with my 3rd patriotic mani and some time early this coming week, I'll be announcing a giveaway. Happy 4th of July!
I did this mani earlier this week in preparation for Independence Day. This is my second of 3 patriotic manis for the holiday. The first can be found HERE. This isn't my best water marble, but I liked the distribution of colors, so it's not a total loss.
I started with a base coat of ChG White On White then marbled using ChG White On White, ChG Frostbite and Zoya Alix. This is my left hand. It took me a while to realize that I was using too much white, so it's more like white, red and blue on this hand.
Here's my left thumb. This is where I started using one ring of white to two each of red and blue. I like the balance better here.
This is my right hand. I hate taking pics of my right hand! Anyway, if you compare the right to the left, you can see how much white there really was on my right hand.
Here's a little better view of my right thumb. All in all, I was happy with this marble, though I don't know if it's the white (it may be a little old) or what, but this marble didn't last very long. I'm wearing this same white today - only 1 day in to a new mani - and it's already chipped. I think I'm going to go back to my good 'ol standby white (SH White On).
This is my favorite finger of the set - pinkie on my right hand. I like the balance of the colors and the symmetry of the pattern. And I can't tell if that's a small bubble in the middle or just an artifact created by the flash, but it wasn't as obvious IRL.
Thanks for hanging out with me for a bit today! I'll be back on Monday with my 3rd patriotic mani and some time early this coming week, I'll be announcing a giveaway. Happy 4th of July!
Labels:
blue,
China Glaze,
mani,
nail art,
red,
water marble,
white,
Zoya
Thursday, June 30, 2011
Happy 4th of July - Version 1.0
Good morning, Kitschies! We've made it to Thursday...how many of you have a 3-day weekend coming up? I do! It's 4th of July weekend but it's stoopid dry here and the governor asked us to please not use fireworks this year. She said she doesn't have the authority to ban the sale of legal fireworks...if she doesn't, who *does*? *sigh* I know we're going to my MIL's house for a BBQ on Saturday and Sunday, we're getting together with our besties and our gaggle of kids for another get together. Funny thing is, we don't have plans for the actual day of the holiday. Who knows. Maybe we'll get some rain that evening and it won't matter what we do because we'll be confined to the house.
I'm a pretty patriotic person; I love red, white and blue. My kitchen is painted red, white and blue and it's decorated with various America-themed trinkets. So, as you could imagine, I have used red, white and blue in my share of manis! This is my first 4th of July themed mani of the season. And, actually, I did this for Memorial Day back in May. LOL I *told* you I'm behind in posting!
This is Orly Monroe Red (gorgeous red creme with subtle red shimmer), ChG Frostbite, Studio M Magic Attraction and white striping polish. I first saw this on Sally Beauty's Eye For Beauty in January and then did my version in February. I liked the design so much, I decided to give it another go...this time in red, white and blue!
I had a bit of shrinkage at the tips with the chunky silver holographic polish and some drag with the blue in to the white, but all in all, I really liked how this turned out.
While I'm thinking about it, I have my bestie to thank for Orly Monroe Red. She asked me to pick up a "hooker red" polish back in the fall. I liked it so much on her that I decided to snag a bottle when I saw it on clearance at Sally Beauty in April.
This wraps up my first of at *least* two 4th of July inspired manis. I did a RW&B water marble Tuesday night that turned out pretty great. I attempted a tie-dye version but that didn't turn out so great. LOL
What are your plans for 4th of July? Do you get Monday off?
I'm a pretty patriotic person; I love red, white and blue. My kitchen is painted red, white and blue and it's decorated with various America-themed trinkets. So, as you could imagine, I have used red, white and blue in my share of manis! This is my first 4th of July themed mani of the season. And, actually, I did this for Memorial Day back in May. LOL I *told* you I'm behind in posting!
This is Orly Monroe Red (gorgeous red creme with subtle red shimmer), ChG Frostbite, Studio M Magic Attraction and white striping polish. I first saw this on Sally Beauty's Eye For Beauty in January and then did my version in February. I liked the design so much, I decided to give it another go...this time in red, white and blue!
I had a bit of shrinkage at the tips with the chunky silver holographic polish and some drag with the blue in to the white, but all in all, I really liked how this turned out.
While I'm thinking about it, I have my bestie to thank for Orly Monroe Red. She asked me to pick up a "hooker red" polish back in the fall. I liked it so much on her that I decided to snag a bottle when I saw it on clearance at Sally Beauty in April.
This wraps up my first of at *least* two 4th of July inspired manis. I did a RW&B water marble Tuesday night that turned out pretty great. I attempted a tie-dye version but that didn't turn out so great. LOL
What are your plans for 4th of July? Do you get Monday off?
Wednesday, March 16, 2011
Kiss Me...
...I'm not Irish. Well, maybe a little, but not enough to count. LOL
Good morning, Kitschies! I hope you have beautiful weather wherever you are. It's supposed to be in the high 70s today and right now it's clear and not a breath of wind. I got to bed at a half-way decent hour last night and I feel a little more rested today. It could partly be because I'm only working half-day today. I'm playing hookie and taking Nate to see a movie. Is it considered hookie if my employer knows and already granted my time off request? *giggle* I was supposed to take my bestie's oldest boy along with, but...*some*body had other plans. Anyway...I'm almost out of here for the day and that makes me feel good!!
Last week I dug out my green and white polish to do a water marble for St Patty's Day. Out of all the marbling I've done, I think this one is my favorite. And not only do you get to see the end result, I'm going to share a sort of tutorial with you on how I do my water marbling. Take a seat...there's gonna be a lot of pics to share.
First...gather your equipment including scissors, paint brush for clean up, Scotch tape, toothpicks, acetone (also for clean up), a cup with room temperature filtered water, base coat, polish colors and top coat. The colors I picked for this marble are Sally Hansen White On and ChG Jolly Holly from the 2010 holiday collection.
After you apply your base coat, start with one coat of one of your colors. You don't have to worry too much about application because this is just a base - you won't see much of it. If you're unsure of which color to use as a base, pick one of the lighter colors or a color you think will be thinner than the others to give it a bit more opacity in the marbling.
Once your base color has dried a bit, wrap each finger with Scotch tape to give a barrier to your skin. If you don't do this, you'll have quite the mess to clean up when you're finished. Be sure to get the tape all the way to the nail on the under side of your fingers.
Using your polish, alternate drops, creating a bulls eye pattern like you see here. It took me a while to figure out how to get this just right. The thing that worked for me is having room temperature filtered water. If it's too cold, the polish hardens and glops and won't spread well.
Then using your toothpick, lightly drag it across the rings of polish to create a design like you have here. You can play around with it as much as you like, but know that the more you move the polish around, the finer, more lined design you'll get.
Pick an area of the design you want on your nails, place your finger nail down in to the image. Be sure to use your toothpick to collect any polish that's floating around on the water before you bring your finger back up. The tape shields your fingers from a lot of the excess polish, but every once in a while, some sneaks past the tape (notice my middle finger).
Once you are finished with all the fingers on one hand, peel or cut off the tape using scissors. You won't have much to clean up if you taped good enough. Either way, though, using straight acetone makes clean up a breeze.
Good morning, Kitschies! I hope you have beautiful weather wherever you are. It's supposed to be in the high 70s today and right now it's clear and not a breath of wind. I got to bed at a half-way decent hour last night and I feel a little more rested today. It could partly be because I'm only working half-day today. I'm playing hookie and taking Nate to see a movie. Is it considered hookie if my employer knows and already granted my time off request? *giggle* I was supposed to take my bestie's oldest boy along with, but...*some*body had other plans. Anyway...I'm almost out of here for the day and that makes me feel good!!
Last week I dug out my green and white polish to do a water marble for St Patty's Day. Out of all the marbling I've done, I think this one is my favorite. And not only do you get to see the end result, I'm going to share a sort of tutorial with you on how I do my water marbling. Take a seat...there's gonna be a lot of pics to share.
First...gather your equipment including scissors, paint brush for clean up, Scotch tape, toothpicks, acetone (also for clean up), a cup with room temperature filtered water, base coat, polish colors and top coat. The colors I picked for this marble are Sally Hansen White On and ChG Jolly Holly from the 2010 holiday collection.
After you apply your base coat, start with one coat of one of your colors. You don't have to worry too much about application because this is just a base - you won't see much of it. If you're unsure of which color to use as a base, pick one of the lighter colors or a color you think will be thinner than the others to give it a bit more opacity in the marbling.
Once your base color has dried a bit, wrap each finger with Scotch tape to give a barrier to your skin. If you don't do this, you'll have quite the mess to clean up when you're finished. Be sure to get the tape all the way to the nail on the under side of your fingers.
Using your polish, alternate drops, creating a bulls eye pattern like you see here. It took me a while to figure out how to get this just right. The thing that worked for me is having room temperature filtered water. If it's too cold, the polish hardens and glops and won't spread well.
Then using your toothpick, lightly drag it across the rings of polish to create a design like you have here. You can play around with it as much as you like, but know that the more you move the polish around, the finer, more lined design you'll get.
Pick an area of the design you want on your nails, place your finger nail down in to the image. Be sure to use your toothpick to collect any polish that's floating around on the water before you bring your finger back up. The tape shields your fingers from a lot of the excess polish, but every once in a while, some sneaks past the tape (notice my middle finger).
Once you are finished with all the fingers on one hand, peel or cut off the tape using scissors. You won't have much to clean up if you taped good enough. Either way, though, using straight acetone makes clean up a breeze.
Let's see the end result, shall we?
Please excuse the whiteness on my middle finger - that's from having to use acetone to clean up what wasn't shielded by the tape. I really, really like how this one turned out. Definitely my favorite so far!
This is my left hand with flash (above) and in sunlight (below). It's hard to pick a favorite, but on this hand it would have to be my index and ring fingers.
I'm horrible at taking pics of my right hand so there's only one (this was taken in indirect sunlight). On this hand, I like the pinkie and index the best. I liked the thumb a lot too, but my topcoat caused a little drag.
This marble even gave me great designs on the under side of my nails! I usually have great wear with my marbles because the tips are already wrapped with polish - hard to get tip wear when the tips are wrapped!
Last one - promise. Here's a closer look at my thumbs. I like them both - probably the left more than the right because the pattern is so different from the others.
*whew* Tired of pictures? Yeah, me too. Kinda. If you'd like a better tutorial for water marbling, check out My Simple Little Pleasures. She does awesome marbles and provides a tutorial for pretty much each design she does.
Happy St Patty's Day! If you go out to celebrate...be careful!! Don't drink too many green beers.
Labels:
China Glaze,
green,
mani,
nail art,
Sally Hansen,
water marble,
white
Subscribe to:
Posts (Atom)