Saturday, January 26, 2013
January 2013
I'm not announcing my comeback, I'm just going to say...I have some pretty polishes to share with you.
With everything I have on my plate, I just can't blog like I used to. I still do my nails (all the time) and I usually take pictures of them, but I rarely get the time to sit down and edit the pictures. My plan, right now, is to compile my manis over the month and share them with you, in bulk, at the end of the month. Sound good? Here we go. And, like always, all pics are clickable to make bigable!
This was my New Years mani. It's kinda Christmas-y and it's all Winter. I started with a base of Milani Juno. Then, using BM14, I stamped snow flakes using ChG Designer Satin and a random white. To finish it all off, I applied a layer of ChG Snow Globe for a little extra sparkle.
I picked up this gorgeous polish at Ulta while on a "we gotta get out of the house NOW" trip with the bestie. I don't usually even look at the Layla polishes because they're pretty pricey, but this happened to be on sale (and I had a coupon). Layla Ceramic Effects Green Galaxy (CE 54) is a gorgeous, gorgeous deep green jelly with green micro glitter, small round green glitter and big green hexies. This polish wore like iron - definitely worth the money!
I was feeling in a nail funk when I did this and it snapped me out of it right away! I started with a base of Revlon Royal (probably one of my top 10 fave polishes ever). After that, I stamped the pretty flowers using Orly Snowcone and BM224. I added pretty purple rhinestones in the center of one flower on each nail.
I did this one originially for a "glitter" challenge for a FB group I'm in, but I couldn't get a good picture of it. You can't go wrong with a classic red nail! This is Zoya Alix with Milani Glitter FX in Red. The Milani claims to be "one coat" but for this much coverage, I started with a coat of Alix and then layered 3 layers of the glitter. That's not what I'd call one coat! I wore this for 4 days and love it.
This is what I ended up using for the glitter challenge. Let me tell you...this is a mess polish! I started with 3 coats of Orly Fowl Play then added a coat of Finger Paints Twisted (I loves me some flakies!). And because that wasn't enough, I ended up using a coat of Milani Jewel FX in Twilight. I am NOT looking forward to removing this (can you say "foil method"?).
So...there's January. Maybe...if you're lucky...I'll post a review of a couple manis from last year later!
Wednesday, October 3, 2012
Randomness
*peeks out* Hey, there Kitchies! How the heck are ya?! I've been busy (yeah, shocker. I know.) I thought I'd take a few minutes and share some random manis with you today! Ready? I have no idea when I wore any of these. Sorry about that.
This is one my top 10 favorite polishes. Revlon Royal is a gorgeous, squishy royal blue jelly. I made it jelly sammich with Jordana Pixie Pink glitter. I loved this!
I caught flakey madness like everybody else did when Finger Paints released their flakey collection. This is Orly Charged Up with Finger Paints Twisted. You can't go wrong with a good flakey polish, but this mani was just kinda meh to me.
Zoya Faye. I want to love this. Really, I do. But I just...don't. I want the rosy purple to show through more. Most of the time, all you can see is the bright gold glass flecks. It is a pretty polish in theory. Just give me a *little* more purple...please.
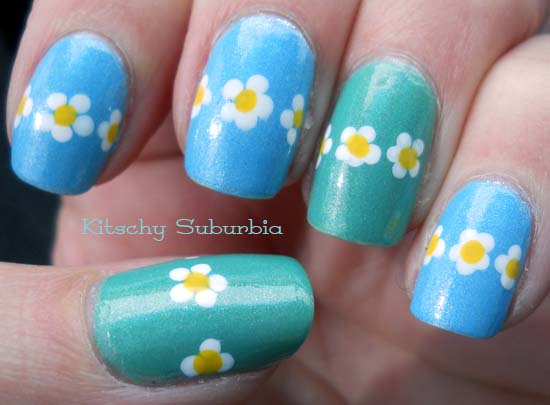
This was better in my head than it was on the nail. The green is Sinful Colors Mint Apple. I don't remember what the blue is, but it's a pretty sky blue with just a touch of shimmer. Maybe a Milani? Yep. I'm pretty sure it's Milani Beach Front. The flowers are Milani White on the Spot and Yellow Whiz (worst. polish name. ever.).
I don't usually like white nails because they're so stark. But, when you pair it with a pretty glitter and make it a gradient, it's a win for me! This is Milani White on the Spot with Fuchsia Jewel FX. I say I don't like glitter because it's such a PITA to remove, but looks like I use it pretty often when you lump manis together like this.
There ya go! Hope that holds you over for a little while. Sorry I've been so sporadic with posting - life doesn't slow down anymore. Be back soon...?
Tuesday, September 4, 2012
Primary Colors
Happy September, Kitschies! How is it possibly already September? Before you know it, it's going to be Halloween. And then Turkey Day. And then Christmas. *sigh* Time is moving impossibly fast. And because of that, I haven't been posting much. In fact, I didn't post at all during the entire month of August. Shame on me!!
The highlights of August: Nate started 1st grade, I had my birthday, and the hubs and I got to go camping!
I know most of you aren't here to see pics of my handsome little boy or of my adventures around the state, so I'll get to why you're really here: the nails!
I'm going to start by saying that I have NO idea when I did this mani. But, it's pretty and I like it, so I'm going to share it with you.
I believe I started with a base of white, but since it's been such a long time, I can't remember exactly. It was either white or the yellow.
Anyway...
I liked the idea of this one more in my head than it looked on my nails. I think I should've used a brighter blue rather than a navy.
This is my right hand. I liked the pinky nail on this hand a lot. And the thumb was good, too, until I knocked it on something and ended up with a big bald spot. But, you know when you've finished a full water marble mani, you really don't feel like redoing one if it gets messed up. Yeah. That's what happened there.
See...if all the nails came out like this one, with the blue really bold, I would've liked it better. Either way, it was a water marble and really...you can't completely go wrong with that.
And here's what I used. I have yet to find a yellow that I really like. A real, primary-type yellow. Any suggestions?
So, there ya go. I won't promise to post more but I can tell you that I have lots of pictures prepped and just sitting there, waiting to be shared with the blogverse!!
Happy September!
Labels:
blue,
mani,
nail art,
red,
Revlon,
Sally Hansen,
water marble,
yellow,
Zoya
Monday, July 30, 2012
Breakfast Nom
Happy Monday, Kitschies! I hope you had a great weekend. We didn't do much this weekend. I got in a good skate Saturday morning, but other than that, we were kinda hermits...and that's ok. School starts soon and I'm sure once it starts, there will be plenty to keep us busy.
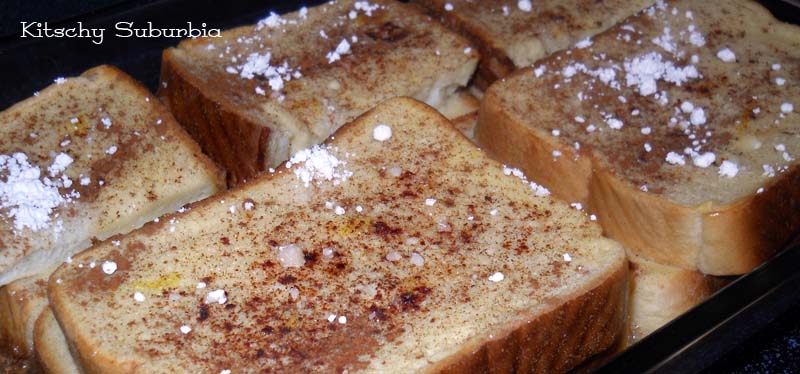
When my family was here visiting, I went trolling Pinterest for some good recipes (you can follow me on Pinterest HERE). I always find lots of great things on there and this recipe I'm sharing with you today is no exception.
French Toast Bake
1/2 cup melted butter (1 stick)
1 cup brown sugar
1 loaf Texas toast
4 eggs
4 eggs
1 1/2 cup milk
1 teaspoon vanilla
Powdered sugar for sprinkling
1 teaspoon vanilla
Powdered sugar for sprinkling
Melt butter in microwave & add brown sugar....stir till mixed. Pour butter/sugar mix into bottom of 9 x 13 pan....spread around. Beat eggs, milk, & vanilla. Lay single layer of Texas Toast in pan. Spoon 1/2 of egg mixture on bread layer. Add 2nd layer of Texas Toast. Spoon on remaining egg mixture. Cover & chill in fridge overnight. Bake at 350 for 45 minutes (covered for the first 30 minutes).
Sprinkle with powdered sugar. Serve with warm maple syrup (I don't do the syrup part).
NOTES: This recipe can be doubled or halved. I made a full recipe for 6 adults and it was just the right amount. I half it for the 4 of us (2 adults, 2 kids). The second time I made this, I made it up that morning and I couldn't tell the difference.
My hubs doesn't do soggy bread but he eats this without trouble. And trust me, you don't need syrup! The brown sugar and butter on the bottom makes a great caramel sauce.
You should try this. I've made a few recipes I've found on Pinterest but this one is definitely one of the best.
I'm going to try to post another Pinterest recipe later this week (along with some more nails, of course).
Thursday, July 26, 2012
Green Things
**Notice anything different? Yep. I changed things around a little. New background = new blog button! Check it out and grab one!**
Good morning, Kitschies! I hope all of you in the Land of the Internets are doing well. Can you believe it's almost August?! Where has the Summer gone? I remember taking Nate to his first day of Kindergarten and now it's almost time for him to start first grade. *sigh*
I've been seriously horrible about blogging lately and I'm not gonna apologize! LOL I've been skating, reading (a lot!!), visiting with family, eating (probably more than I should), and watching TV (not a lot). I'm home with Nate today and I thought I'd take advantage of the quiet (it's 7:30 and he's still in bed - that's how you know he's sick) and do some picture prep and maybe get a post (or a few, hopefully) knocked out. I was reviewing the backlog of pictures and I came across this one that I'd forgotten about.
This is the gorgeous Zoya Midori. It's a beautiful lime green with a golden flash. It's bright but not overly obnoxious (say, like CC What A Shock!).
I love how the gold flash makes this green glow. I'm not usually too partial to green polish, but this one is so pretty - it's a Zoya must have. I had a bit of a thin spot near the cuticle on a few fingers but I don't think it's the polish's fault - probably more of a rush fault on my part.
I don't usually post makeup looks but keeping in the swing of green things, I thought I'd share a look I did for the Albuquerque Comic Expo in early June.
I said I'm not too partial to green nail polish...but I loves me some green eyeshadow! The gold is Fyrinnae Rapunzel Had Hair Extensions, lime green is from the Maybelline Forrest Fury palette and the dark green is a base of the darker green in Forrest Fury with Fyrinnae Dark Fantasy over top.
I'm off to snuggle with Mr Nate. Fevers are the worst! Enjoy your day and come back soon - there will be more things shared on Kitschy Suburbia soon.
Monday, June 25, 2012
Summer Salad
Good morning, Kitschies! I hope you had a good weekend and didn't melt in the heat. It's been super hot and there's no rain in sight. I'm really hoping we get some good monsoons this summer, but it's not looking like that so far.
ANYway...I've been trying to eat healthier (yes, I know you've heard that from me before), but this time I'm serious. I kinda have to eat better because junk in = junk out. You're probably tired of hearing me talk about it, but derby kicks my ass...in a good way. I can practice day in and day out, but until I get my eating under control, I'm not going to see the changes I want/need to see. So, as a way to keep on top of it, I went on a "healthy" recipe hunt. You usually think healthy = tasteless (at least I do), but I did my best to make sure what I found was good for you AND tastes good, too. This is the first recipe I tried.
Quinoa Salad
Ingredients
1 cup uncooked quinoa
1 cup feta
1 can (15 oz) black beans, drained and rinsed
1 can (15 oz) whole kernel corn, drained
Red bell pepper, diced
Spinach, handful, chopped small
Red onion, a few rings, diced small
Dressing
1/2 cup fresh lime juice
3 Tbsp red wine vinegar
1/4 cup olive oil
1/4 tsp Cayenne powder (more or less, depending on preference)
1 Tbsp cumin
1/2 tsp salt
Pepper to taste
Cook quinoa. To cook quinoa bring 1 1/4 cup water or chicken broth to a boil (basically the ratio is 1 part quinoa to 1.25 part liquid). Add 1 Cup rinsed quinoa, give it a good stir, reduce heat to low and let it simmer for about 30-35 minutes**
While your quinoa is simmering, make up your dressing by whisking together all dressing ingredients. In a separate bowl add black beans (rinsed, drained), corn (rinsed, drained), diced pepper, spinach and red onion.
Once quinoa is done cooking and has cooled, add it to the other ingredients. Pour dressing over everything. Mix up. Enjoy!
NOTES: I didn't use fresh limes - I just use the prepared juice. Next time I think I'll use a bit less cumin - it was a bit strong for my taste. And...it didn't take anywhere near 30 minutes to cook the quinoa...maybe 15-20 minutes. I didn't use all the dressing but kept the remaining dressing for a marinade - I think it'll be great on chicken.
So colorful! I really, really like this, which is good because the hubs...notsomuch. And the kids? I didn't even ask them to try it because my previous quinoa recipe didn't go over so well with them.
I have been eating on this over the weekend and it's definitely better the second day - all the flavors have had a chance to marry together. I described this to my sister and she said it sounded like Greek salad, which I think is a good description. Kind of a southwest Greek salad!
It's shaping up to be a busy week, so take it easy and enjoy some great summer food! Oh...and I promise to get my blog background changed soon - though it's nice to think of winter when it's so flippin' hot out!
Saturday, June 16, 2012
Blue Skies Ahead
Happy weekend, Kitschies! I hope you're busy doing things that make you happy and you have nothing but blue skies ahead. Here in the Kitschy household, I'm keeping down the fort while the hubs is on a camping trip. On today's agenda? I hope to get some cleaning done and I need to run a few errands - tomorrow is Father's Day and ideally, I'd like to get out while the hubs isn't home but that's not really looking like it's going to happen.
So...in the meantime, I have a mani to share with you. I haven't a clue when I did this mani - you all know how seriously behind I am in posting.
This is 2-3 coats of a powder blue creme from Color Club (Blue Light, maybe? It probably came in a set - those don't usually names on the bottles). As with most pastels, application was horrible. You can see drag marks on my index and ring fingers. With a dotting tool, I started with SH Thinking of Blue (navy), then combined it with white to make the cornflower blue dots. I finished off the gradient dots with SH White On.
All in all, I was happy with this mani. I have a question, though...how hard is it to make a pastel without it being super streaky and a pain in the butt to apply?? Do you have any tricks when it comes to applying pastel polish? I'd really love to hear them.
Happy weekend! See you soon. :)
Labels:
blue,
Color Club,
mani,
nail art,
Sally Hansen
Subscribe to:
Posts (Atom)